October 21st, 2014

Two pictures

.
Two pictures to share with you:
.

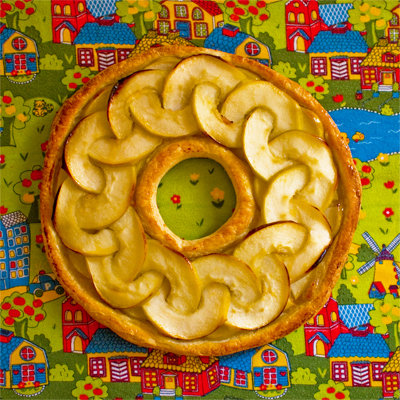
an alternative design for an apple galette. Chain link pattern on round puff pastry. Caramelised apple sauce. Tamami. www.cocoandme.com - Coco&Me - Coco and Me

.

Sometime ago, I was playing around with an alternative design for an apple galette.

.

The recipe goes something like this:

1. Peel Granny Smith apples & thinly slice with a mandolin.

2. The raw apple slices are too brittle to loop in to pattern, so blanche them for 1 minute, then dunk in cold water to stop it from cooking further. (This method also stops them from oxidising & turning brown!)

3. The chain design only works with similarly large slices, so to use up the unused end scraps of apple, make a caramelised apple mix which will go in-between the apple chain & the puff pastry base.

4. Use an apple corer to cut a circle in the centre of the apple slices, then loop them up to make a chain pattern.

5. Then assemble that on puff & caramel mix, & bake…

.

… The recipe itself was a definite success, super moreish, the caramel layer really made it special together with the flakey puff pastry. But the chain design was too fiddly to say the least. Perhaps I’ll ditch the pattern idea & go for a more universal look after-all, like how others do it, layering the slices like roof tiles, so that I can share the recipe properly with you one day…?

.

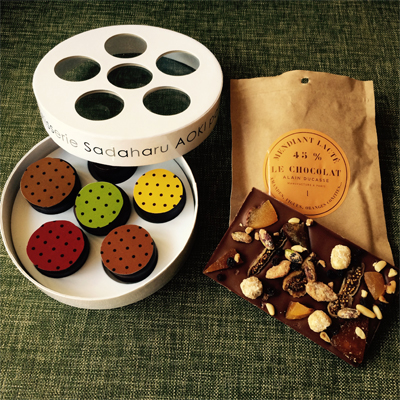
Gifts from Paris - Chocolon (chocolate covered macaron) from Sadaharu Aoki Paris and Mendiants Chocolate bar from Alain Ducasse. www.cocoandme.com - Coco&Me - Coco and Me

.

Last Saturday I had a surprise visit from Mrs.C & her husband Mr.E from Paris! :) :) :) It was a super happy moment. :) :) :) Smiles (Mrs. C), smiles (Mr.E), smiles (Me) !  It was really great to catch up on each other’s news! The extra surprise was that they’d brought with them a gift for me too! Wow… thank you… It was chocolate-coated macarons from my favourite Japanese patissier Sadaharu Aoki, & a mendiant chocolate bar from the one & only Alain Ducasse! I own cookbooks by both of these men* & absolutely respect them, so believe me when I say that these sweet things are highly valued by me & will be truly enjoyed, ~ slowly…, not a single crumb will be wronged by landing anywhere other than in my mouth.

.

In fact, why not try one now as I write. Oooooh… (fingers dancing over the macarons), let’s see…, the…, yes, the mac with the red top. Ah! Raspberry! Or should I say ‘framboise’ since it’s from France. ~ (sigh) I needs me a trip to Paris again .Yep… (scoff), yep… (munch).

.

* Here’s a confession ~ I’ve not counted (& I dare not want to ~ it’ll be a bad reality check of my spendings), but I think I have around 150 food-related books in my bookshelf… When I’m ‘in’ to something, I like to get ‘in’ to it knee-deep obviously. Lol… Recently I’m ‘in’ to dropping in to the local Oxfam Bookstore (a charity second-hand bookstore here in UK) to check their latest offerings. Last time I was in there, I bought a signed Raymond Blanc book from 1991 for £5. The pictures are a little dated, but every single one a fantastic, no-nonsense recipe. I’m learning a lot from it, currently cooking from the vegetable section. I also plan on making the pumpkin soup from this book for Halloween! ^^

.

April 2nd, 2014

Coco&Me’s Animal Dome Cakes

.

Last Saturday, I skipped work at the market despite it being Mother’s Day weekend which would certainly have been a hands down fantastic cake-sales opportunity. Instead, we held a a joint birthday party for our daughter S with her classmate K.

.

We invited all the kids from their class. And for the entertainer, we chose the Animal Man Nick to come give an AMAZING show with his private collection of exotic animals! Nick brought over his red foot tortoise, tarantula (!), giant African land snail, giant black millipede, meerkat, chinchilla (v.cute), tawny owl, emperor scorpion, skunk (!), bearded dragon & to finish the show, a large black snake. Thanks to the show & to K’s mum who was fantastic to be organising the party with, the party was a big hit. Phew…! ^^

.

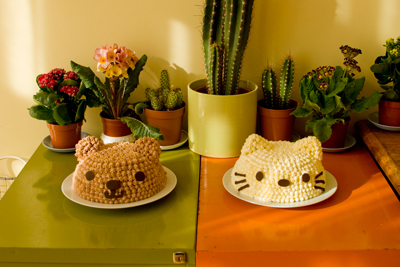
To go with the theme of animal, I made two birthday cakes – a bear & a cat shape – for each of the birthday kids to blow their candles on. I suppose I could have taken the inspiration for my choice of which animal to make from Nick’s exotic animals, but it would’ve been more of a challenge to shape I think & perhaps not so cute or tasty-looking…!? (a bearded dragon shaped cake…?!) Lol!

.

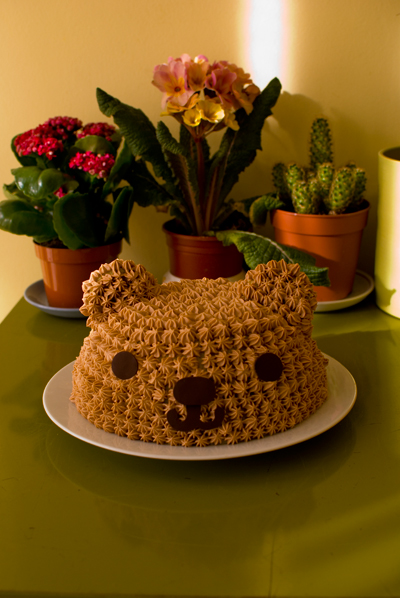
Coco&Me - Coco And Me - Domed Birthday Cake - Broadway Market E8 - www.cocoandme.com - Tamami Haga - Hello Kitty cake - Bear shaped cake - Genoise sponge with chantilly cream creme

(Chocolate bear.)

.

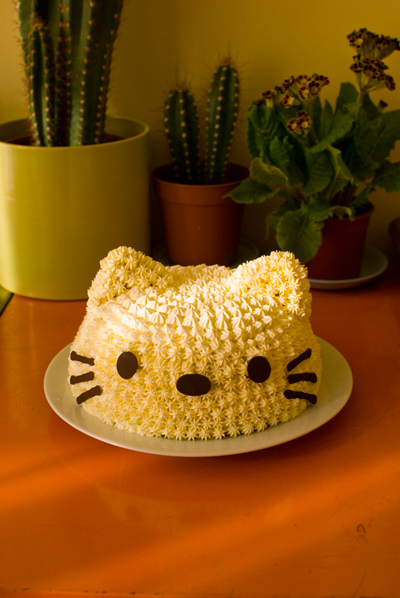
Coco&Me - Coco And Me - Domed Birthday Cake - Broadway Market E8 - www.cocoandme.com - Tamami Haga - Hello Kitty cake - Bear shaped cake - Genoise sponge with chantilly cream creme

(Chantilly Cat. I studied Hello Kitty for the features.)

.

Coco&Me - Coco And Me - Domed Birthday Cake - Broadway Market E8 - www.cocoandme.com - Tamami Haga - Hello Kitty cake - Bear shaped cake - Genoise sponge with chantilly cream creme

(♥ Together ♥)

.

To make the dome shape, I buttered then cling-filmed the inside of a mixing bowl. Next, carefully lined a sheet of genoise sponge (baked in a roulade pan) in the internal wall. After that, just like when assembling lasagne, there are alternate layers of cream, strawberry, sponge. A while of refrigeration later, it is set enough to de-mold out to the plate to then decorate.

.

Coco&Me - Coco And Me - Domed Birthday Cake - Broadway Market E8 - www.cocoandme.com - Tamami Haga - Hello Kitty cake - Bear shaped cake - Genoise sponge with chantilly cream creme

The facial features are made from chocolate. Shapes are piped out on to a baking sheet, then once solid, used the reverse-side (the side that was touching the baking sheet) as the front because it is flatter & matt. These are simply stuck on directly to the cream on the cake.

.

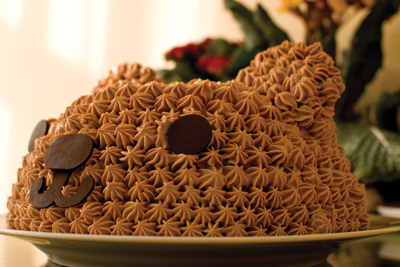
Coco&Me - Coco And Me - Domed Birthday Cake - Broadway Market E8 - www.cocoandme.com - Tamami Haga - Hello Kitty cake - Bear shaped cake - Genoise sponge with chantilly cream creme

The cream is simple chocolate chantilly piped with a closed-star tip.

.

x . . x . . x . . x . . x . . x . . x . . x . . x . . x . . x . . x

.

A spherical cupcake to take away!

.

Don’t know about how it’s done elsewhere, but here in the UK, it seems to be the norm for the invited children go home from the party with a slice of the birthday cake.

.

Instead of hastily cutting the large cake during the party, which, not only can it be stressful while entertaining, but can potentially become a messy affair, what with the cream & all, I opted to bake 30 individual cupcakes that is easier to give out. It is also easier for the children to hold.

.

– Besides, there was a cake idea I’ve been meaning to try out, & it seemed a good opportunity to invest my time & effort in to it.

.

Coco&Me - Coco And Me - Domed Birthday Cake - Broadway Market E8 - www.cocoandme.com - Tamami Haga - Bear shaped sphere cake - Domed genoise sponge with silicine mould

(… with milk, white & strawberry chocolate features.)

.

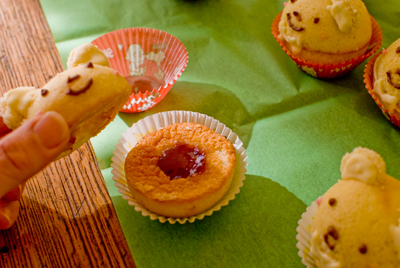
Coco&Me - Coco And Me - Domed Birthday Cake - Broadway Market E8 - www.cocoandme.com - Tamami Haga - Bear shaped sphere cake - Domed genoise sponge with silicine mould - raspberry jam filling

(Snuggly sitting in a mini-muffin case!)

.

Coco&Me - Coco And Me - Domed Birthday Cake - Broadway Market E8 - www.cocoandme.com - Tamami Haga - Bear shaped sphere cake - Domed genoise sponge with silicine mould - raspberry jam filling

(I made thirty!)

.

To make the animal cupcakes, I baked semi-sphere sponges using silicone moulds. Using a cupcake corer/ plunger, I cut out two circular discs which was used to form the ears. The cake was again made from genoise, but any sponge recipe will work so long as there is enough flour in it to form the pillar structure to keep it’s domed shape without it deflating. The recipe will have to have enough butter content too so it de-moulds cleanly, but then again, the cake must not be too heavy on butter either, as that leaves the paper cupcake casing with greasy imprints.

.

Coco&Me - Coco And Me - Domed Birthday Cake - Broadway Market E8 - www.cocoandme.com - Tamami Haga - Bear shaped sphere cake - Domed genoise sponge with silicine mould - raspberry jam filling

(I stewed down raspberry jam & filled the hole where I cored out the ears.) 

.

January 21st, 2014

Crepes dentelles (aka gavottes & paillets feuilletines)

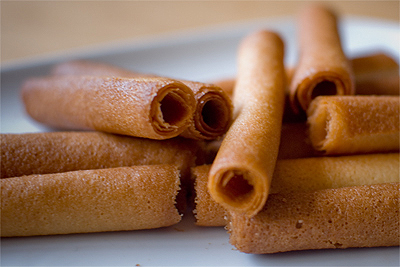
www.cocoandme.com - Coco&Me - Coco And Me - Crepes Dentelles/ Gavottes/ Paillets Feuilletines recipe - with step by step pictures - Broadway Market E8 - Tamami - Cake Stall - London

.

Recently I needed some ‘paillets feuilletines’ for the French dessert I was making. I don’t know about where you live, but here in London, it is not easy to get them off-the-shelf. It is definately not mainstream, & instead it is a specialist baking ingredient. Ofcourse, I could get them online, but they sell them in large packs (all I needed was a tiny amount to cover the side of a cake as decoration), & besides, you’ve got to wait several days to get it delivered! Let alone forking out the shipping fee! (I’m a stingy kind of a gal.)

.

Upon research, I realized that crushing up ‘crepes dentelles’ (another name for these is the brand-name called ‘Gavottes’) is a great substitute, or if not the same as the ‘paillets feuilletine’ itself. You won’t believe how happy this realization made me! Because it means that I could make them at home whenever needed, moreover, it’ll be fresher & crunchier! (And quite probably superior than store-bought because it won’t have any substances you won’t normally include in a home-baking situation).

.

  • Def: Crepes dentelle is a wonderfully delicate & flaky cookie that is often folded in to a cigar shape. Buttery in flavour, it is made from thin crispy crêpe that is rolled as soon as it is out of the oven. It originates from Quimper, a charming little town with an almost village-like atmosphere, in the cultural heart of Brittany, France. Crepes dentelles are a delight to eat on it’s own or pairing it with cream-based desserts.
  • Def: Paillets Feuilletine is a baking ingredient that is often used as a component in French desserts for it’s crunchy texture. It is used for Praline Feuillete for example, where feuilletines are stirred in to chocolate & praline paste (… think posh version of ‘chocolate cornflake cake’). Pâtissiers will then spread this thinly in a layered cake to add crunch to a moussey cake. Chocolatiers might enrobe feuilletines mixed ganache to make crunchy bonbons.

.

So here below is my own recipe for Crepes Dentelles slash home-made Paillets Feuilletines. As with all my recipes, I have left no stone unturned & has lots of notes alongside. It uses basic ingredients, but has a fair amount of variables to consider. And if you are making the cigar shape, you’re most definitely throwing in some burnt fingers in to the bargain too. Discouraging? Sorry, but yeah, I thought it wise to warn you prior…

.

x – x – x – x – x – x – x – x – x – x – x – x – x – x – x – x – x – x

.

Crepes Dentelles/ Paillets Feuilletines Recipe:

(Yields 18 Crepes Dentelles using a 9cm x 16cm template)

.

Ingredients:

  • 60g melted butter
  • 110g sugar
  • 1 egg white
  • 60g flour
  • about 35 to 40ml of water

.

Equipments you’ll need:

  • A stencil template (please read below the method for how to make)
  • Metal spatula
  • Two or more sheets of Silpat

.

Method:

  1. 1. Preheat the oven to 210 degrees.
  2. 2. Melt 60g of butter completely in a mixing bowl.
  3. 3. Put 110g of sugar in the hot melted butter. Stir until the sugar has dissolved & is not grainy.
  4. 4. Whisk in 1 egg white.
  5. 5. Sift in 60g of flour.
  6. 6. Use a whisk to mix in to paste.
  7. 7. Pour in half of the water & mix well. Then pour in the rest gradually to the correct consistency.
  • (Note that here, the final consistency of the batter is very thin & runny like single cream. – This consistency is THE KEY to how smooth your Crepes Dentelles’ surfaces will turn out to be. If too thick, the surface will be rough with air bubbles. If too thin & runny, you will be having trouble containing it within the stenciled shape. I have given you the rough indication of 35 to 40ml of water, but the correct consistency for your batter has to be gaged by your senses, as it is variable.)
  1. 8. Spatula all of the batter in to a piping bag.
  • (It makes the following work much more methodical & a lot less messier.)
  1. 9. Lay the stencil template on the silpat. Hold down to keep it flat & in place. Spread on the batter evenly with the spatula.
  • (There are three things to consider here:
    A: Domestic ovens tends to brown goods unevenly. For example, my oven browns faster from the edges, which makes it difficult to evenly brown my sheet of Crepes Dentelles. So, for ‘even’ browning, the placements of the batter on the silpat has to be considered. The middle of the tray (away from the edges) is best.
    B: Also, please resist the urge to spread too many shapes on one tray. When the time comes to rolling them in to Crepes Dentelle shapes, there is only about 15 seconds to do so before it’s too rigid. About two spreads per tray would be ideal I think.
    C: Spread thin. Please read about this in the notes below under the title ‘Stencil’.)
  • (Please use the stencil even if you are making Paillets Feuilletine, as it’s easier to spread batter thinly & evenly.)
  1. 10. Place the silpat on the baking tray.
  2. 11. Insert this in to the middle-shelf of the pre-heated oven & bake.
  3. 12. In the meantime, while you wait for it to be baked, spread the next batch on another silpat. You can pop it in when the first comes out.
  4. 13. The baking could take anything between 2 to 4 minutes. Best to check wether it is done from 2 minutes onwards. You might also want to turn your baking tray around to brown it evenly.
  • (It is done when there are no white areas. But be careful not to over-bake – it could be that extra 10 seconds more that makes your Crepes Dentelles/ Paillets Feuilletines taste burnt. Use your first batch as an indicator to get familiar with the correct shade of brown.)
  1. 14. If making Paillets Feuilletine, take the baked sheets off the silpat to cool, then crush with your fingers. If making Crepes Dentelles, immediate start rolling it in to shape. – To roll in to round cigar spirals, use a straw or any thin cylindrical rod.
  • (The crepe is only pliable for the window of 15 to 25 seconds.)
  • (I prefer to turn the sheet back to front, & roll the surface that was facing the silpat on the inside. This is because the silpat side is glossy from being baked on the glass-fiber within the silpat. Furthermore, detaching the sheet off the silpat first makes the rolling process easier.)
  1. 15. Continue baking by swapping turns between the two silpats. Just remember to clean off any excess bits on the silpat by wiping with kitchen paper or by scraping with a different spatula.

.

www.cocoandme.com - Coco&Me - Coco And Me - Crepes Dentelles/ Gavottes/ Paillets Feuilletines recipe - with step by step pictures - Broadway Market E8 - Tamami - Cake Stall - London

.

x – x – x – x – x – x – x – x – x – x – x – x – x – x – x – x – x – x

.

www.cocoandme.com - Coco&Me - Coco And Me - Crepes Dentelles/ Gavottes/ Paillets Feuilletines recipe - with step by step pictures - Broadway Market E8 - Tamami - Cake Stall - London

(From second batch onwards, remember to clean off any bits on the silpat by wiping with kitchen paper or by scraping with a different spatula.)

.

www.cocoandme.com - Coco&Me - Coco And Me - Crepes Dentelles/ Gavottes/ Paillets Feuilletines recipe - with step by step pictures - Broadway Market E8 - Tamami - Cake Stall - London

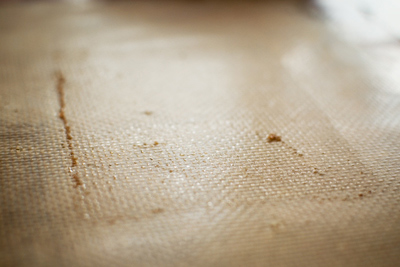
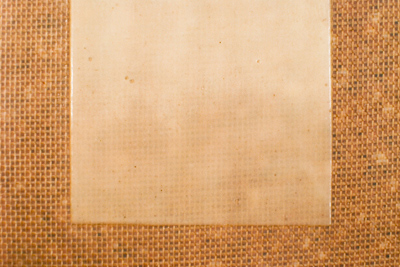
(Spread the batter thin. You can almost see through to the mesh of the silpat!)

.

Stencil:

  • Finding the material: To make the stencil template, first find a plastic sheet that has the desired thickness. The thickness, or should I say ‘thinness’ is vital to get right. If your crepes are too thick, it’ll be chewy. But if it is too thin, it will be too fragile & break apart as you roll. For my crepes, I used a 240 micron (2.4mm) acetate sheet that I purchased from CassArts. Sometimes, there might be something similar around the house that could turn in to a good stencil. The stiff plastic folder sleeves for filing could be a contender. Or maybe you have a see-through plastic gift box that is stiff enough? If push comes to shove, perhaps you can even cut out the side of your cereal box…
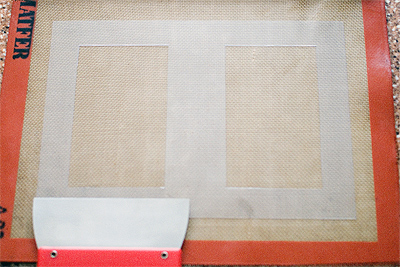
  • Cutting to size: I like to cut mine with lots of ample frame all around so that the batter does not land on the silpat. It keeps the silpat clean & crumb-free for the next batch. The measurement of the rectangle is up to you. FYI, mine is 9cm x 16cm.

.

www.cocoandme.com - Coco&Me - Coco And Me - Crepes Dentelles/ Gavottes/ Paillets Feuilletines recipe - with step by step pictures - Broadway Market E8 - Tamami - Cake Stall - London

(My spatula is wider than the cutout area.)

.

May 9th, 2013

Bite-size french toast using everyday pre-sliced bread

NB: Please note, this recipe is especially created for when using everyday pre-sliced bread from the supermarket that is not stale.
.
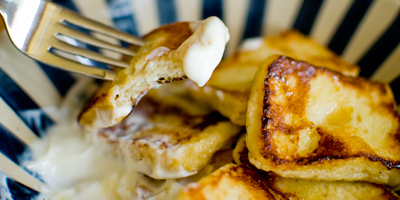
Coco&Me - www.cocoandme.com - Coco and Me - Quick french toast recipe with process pictures
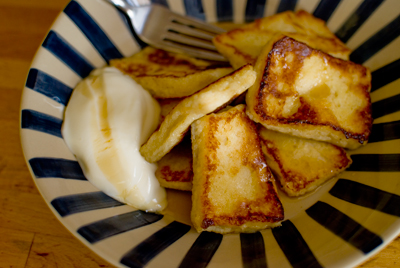
(Bite-size French Toast! No need to fuss with knife! ^^)
.
Desperately seeking ‘something’
Picture this – bang in the middle of the night, you’re working on the computer. Then the train of concentration loses its steam & thoughts of snacking invade the mind. You ponder what goodies you might’ve lurked in the kitchen cabinets, but a pang of desperation throbs you when the realization of anything everything sweet is missing from your life. Cue the stomach & its whining growl…  
.
… This French Toast recipe actually came about at such moment. I desperately wanted a sweet ‘something’ to snack on in the middle of the night. But it needed to be:
  • very quick & simple to make (will not want to wait for my sweet fix)
  • easily can make for just for one person (it’s just me)
  • use ingredients that’s always at hand at home (it needs to be a reliable recipe to fall back on every time)
  • no need to fire up the oven (too fussy)
  • does not use the hand mixer (too noisy at night)
.
Hmmm, French Toast! As a mid-night feast! Ah…, yes-yes, ofcourse it’s normally consumed for breakfast or brunch, I know that, but it’s ingredients – eggs, sugar, milk, bread & butter, I always have at home & who cares about formalities when no one is watching in this nocturnal hour? It should be simple enough to put together – just dip the bread in eggy milk then pan-fry it with butter, & hey voila!
.
And so my quest starts.
But…, hang on, the first time I made it, it didn’t taste great. The result was unforgivingly too soggy in the middle. Why? Then I analyzed this:
= I’m using cheap thinly-sliced bread from the supermarket & the bread is not stale like it ought to be. 
.
Stale? Yes,typically you’re supposed to use stale bread that’s gone a bit tough & lost a bit of moisture. I guess it must be a universal rule for it. I mean, it’s even called ‘pain perdu’ in French, which means “lost bread”, suggesting that the bread in question is of a wasted, or forgotten one.
.
But realistically, how often do you have a perfectly stale bread at hand when you need it? I certainly don’t. Besides, the supermarket bread rather goes mouldy than stale when old. And so my solution to this was to… lightly toast the fresh bread (then cooling it) before dipping in the eggy mixture. That should mimic stale bread by taking some of the moisture away!
.
To remedy the sogginess, I propose five solutions:
  • Put less milk in.  
  • Cut the bread in to smaller pieces so that it soaks the mixture quicker, & cooks to the core quicker. Smaller is also easier to flip over in the pan without fuzzing the shapes.
  • Fry the bread at very low heat to cook through to the core.
  • Use the lid as you fry so that it steam-cooks the bread. It’ll get fluffier & bouncier.
  • Warm the milk in the microwave prior to combining with egg mixture (I got this idea from the way creme patisserie is made). This in effect will make it quicker to cook as it is already warm when it hits the pan.
.
Crust or no crust
When I was a child I used to just tear out & eat just the innards of the bread, which totally annoyed my mother. – Even now at age 37, I secretly still prefer to chop away the crust especially when making sandwiches, but my Mr.D ~ who is German & proper (Lol!) ~ would scorn, which totally makes me feel like a silly child again, so I daren’t do it nowadays. And now that we are supposed to set a good example in front of our children, I can never kiss goodbye to ‘le crust’.
.
BUT! French Toast is an exception. This is a sweet dessert! It’s an indulgence. Might as well have it the way we like it huh? :) Besides, jokes apart, I personally think that the egg-sogged crust lends a slight wet cardboard-y texture, & takes half the fun out of eating the main super soft part anyways!
.
Aesthetically pleasing French Toast shape? = 8:5 ratio
Upon cutting the bread, call me pedantic or just plain old silly, but I thought to myself: I wonder what the ‘most pleasing rectangle’ is?  
.
The answer I settled on was to cut it to the golden ratio, which the special number is approximately 1.618. Meaning, I will cut the length to 1.618 times of the width. Or to round it up simply, the ratio of length to the width will be 8:5. I’m sure the ancient Greeks would approve of this french toast shape! Lol!
.
NB: If you cut the toast in to 4, it’s pretty much 8:5 each, so no need to get the ruler out! 
.
(Please take this whole measuring thing with a pinch of salt though, it’s all a bit of a pa larva that I’m making here…! You can ofcourse cut it in any way you like!)
.
So how long should the bread soak in eggy milk?
Some say over-night, some say 3o seconds & hey pronto. I’m more in the latter camp. I like the idea of this to be a quick dessert that can be made by whim ~ impromptu with things that can be found in your everyday kitchen. Besides, the pre-sliced white bread from the supermarket sucks the mixture up like a kitchen sponge in no time anyways!
.
Dressing up the French Toast
Please please try it with plain yogurt on the side. And a drizzle of maple syrup which won’t go amiss. And ah, perhaps even a sprinkle of cinnamon powder! The play between the cold yogurt & the hot french toast is so fine~♪, it’s so good~♫. The slight tang of the yogurt beautifully sets against the sweet toast too. 
.
x . . x . . x . . x . . x . . x . . x . . x . . x . . x . . x . . x . . x . . x . . x . . x . . x
. 
Coco&Me Quick French Toast Recipe
.
Ingredients:
  • 2 slices of white bread (preferably thick)
  • 1 egg
  • 15g sugar (vanilla sugar if you have it)
  • 60g milk (full fat if you have it) 
  • A knob of salted butter (for the frying pan)
  • Maple syrup (optional)
  • Plain yogurt (optional)
.
Method:
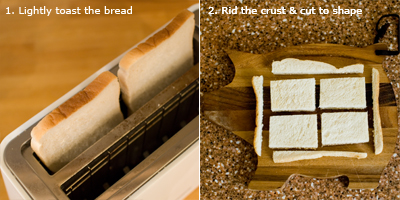
  • 1. Toast the bread lightly. (Here, don’t brown it, as you’d have the burn taste coming through the French Toast.)
  • 2. Cut the crust off the bread. Then cut to smaller size. (It’s easier to cut without squishing the ends if you cut the toast when it has cooled down.)
Coco&Me - www.cocoandme.com - Coco and Me - Quick french toast recipe with process pictures
.
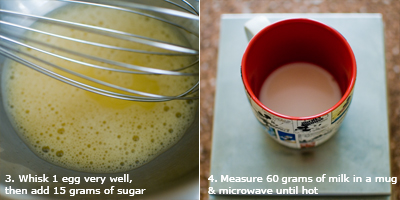
  • 3. In a bowl, whisk 1 egg until it loses its bounce, then add the 15 grams of sugar. Whisk until the sugar has completely dissolved.
  • 4. Measure 60 grams of milk in a mug & microwave until hot.  
Coco&Me - www.cocoandme.com - Coco and Me - Quick french toast recipe with process pictures
.
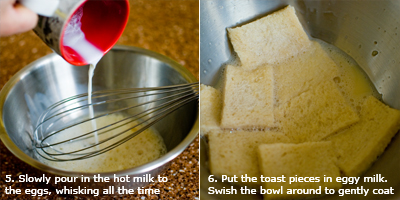
  • 5. Slowly pour in the hot milk to the eggs, whisking all the time. (The hot milk will not cook the eggs as the sugar will act as a barrier.)
  • 6. Put the toast pieces in the eggy milk. Swish the bowl around to gently coat the toast on both sides. (Don’t handle by hand as the toast is very fragile when soggy, it will lose shape or tear.)
Coco&Me - www.cocoandme.com - Coco and Me - Quick french toast recipe with process pictures
.
  • 7. Heat the frying pan with medium-low heat. Dissolve the knob of butter. Then align the soaked rectangular bread.  
  • 8. Pop the lid on & lower the heat to minimum.
Coco&Me - www.cocoandme.com - Coco and Me - Quick french toast recipe with process pictures
.
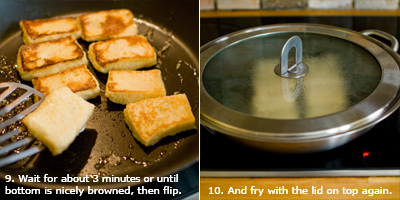
  • 9. Wait for about 3 minutes or until the bottom side is nicely browned, then flip to the other side.
  • 10. And fry with the lid on top again.  
Coco&Me - www.cocoandme.com - Coco and Me - Quick french toast recipe with process pictures
.
  • 11. When the bread is nicely browned, transfer to a plate & eat it straight away while it is hot! (preferably with a big dollop of plain yogurt & a generous drizzle of maple syrup!)
Coco&Me - www.cocoandme.com - Coco and Me - Quick french toast recipe with process pictures
Bon Appétit! T xx  
.
x . . x . . x . . x . . x . . x . . x . . x . . x . . x . . x . . x . . x . . x . . x . . x . . x

January 8th, 2013

Galette des Rois 2013

.

Hi!!! Happy New Year~!!!!!!

How was your winter holiday? Did you get a good rest? Hopefully all charged up, ready for the new year? ;-) And how did your first week of 2013 pan out? Back to school or work already?
.
For me, soon as entering the year, all I think about is the Galette des Rois for Epithany (which was the 6th January).
.
But this year, I missed the date. The 6th landed on a Sunday this year & I just couldn’t find the time. It proved to be too much of a challenge to fit a task such as classic-puff-pastry-making when the kids are around…
.
I mean, how can I work on a pastry that requires so much attention when interruptions aplenty!
.
The kitchen is a highway of coming ins & outs, “S” to show me a drawing or “I” to ask me to solve a quiz. Sometimes it could be a “come upstairs & look at my lego model”, or it might be the little one forever pulling the hem of my skirt as I move around in the kitchen. Running around the central kitchen-island playing chase might be an option for them too… It’s simply impossible to do anything that remotely needs concentration…! So, at times like that, I put my hand up & resign, I let go of any baking desires & join in with running around playing chase too. Might as well, hey.
.
Anyway, so here’s my Galette des Rois, that was not made on Epithany day, but on the following day.
.
This year I made three.
.
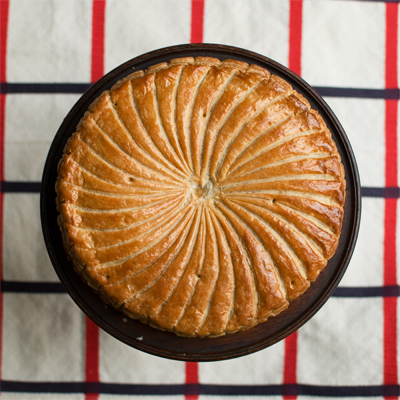
(The swirly pattern!!)
.
Shame about the unsightly middle, but atleast it came out circle & relatively flat! To etch the swirls, I used the edge of a round cake card to depress an impression, & then use that as the guideline to score with a scalpel knife. When scoring, I always apply same pressure & “try” to cut less then 1mm deep. (… notice “try”. It’s su~per difficult!!!) Lastly I brushed cooled down sugar syrup on just-baked hot galette to make the surface shiny & appetizing. The momentary sizzling sound as the syrup initially hits the hot pastry is one of my favourite sounds in the kitchen.
.
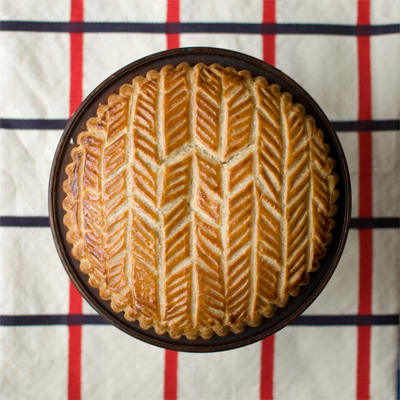
(The ladder pattern!) 
.
Grr, there’s a crack in the design…! Humph. But I think the colour is the best out of the three. I dissolved coffee granules in the egg wash to make it dark – this technique is the same as when egg-washing the Gateau Basque. Also, have you noticed that the edges are scalloped? Well, instead of cutting around the pastry with a knife like usual, I used the tart tin edges like a cutter!!! There’s a couple of advantage point to my technique other than aesthetics – as you press the tin down to cut off the excess pastry, it seals the two sheets of pastry tighter together. You can also use the scallop shape as a guide for when crimping the sides.
.
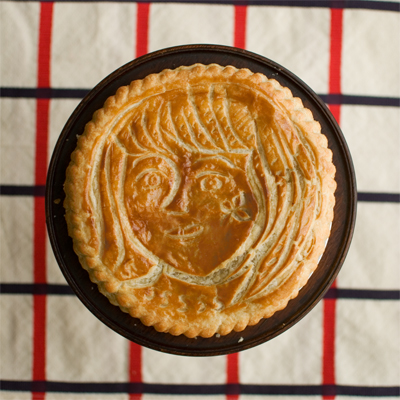
Coco&Me - Coco & Me - Galette des Rois 2013 - girl face design pattern scored/ drawn on to - homemade classic puff pastry - Pate Feuilletee Clasique - www.cocoandme.com
(My original design! My daughter S with a flower cheek!) 
.
Out of pure luck, the etching came out in a painterly brush-strokey feel, which worked quite well with the design I think. I’m happy with this one, but how I wish I didn’t brush the sugar-syrup on the surface at the end…! The face looks too shiny, as if you slathered sun-oil on a sunny holiday…! Lol! Definitely not a winter look! (…unless the girl was lucky & went somewhere hot for the winter hols I guess…!)
.
Anyway, hope all is well with you guys! Chao for now! 
T xx

« Previous Entries