May 28th, 2007

How to temper chocolate

Coco&Me picture of a fresh cacao pod - open

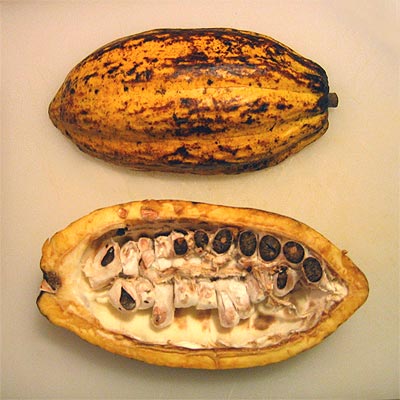
(Picture: I purchased two fresh cacao pod several years ago during the National Chocolate Week. The shop assistant told me they are from Cameroon. I bought them for £7 each. Très expensive. But it was an experience to remember for sure! – One was for keeping to dry, & the other for cutting open. The fresh beans were acrid & I didn’t like the taste atall, but the white pulp surrounding them was sweet & exotic like I never ever tasted before.)
.

.

Here comes the big entry.
I am finally tackling this rather lengthy subject of tempering chocolate, after avoiding it for sometime…, shunning it under the carpet of “let’s write about easier things for now”.

.

But it’s become inescapable. I’ve already featured two recipes (ganache truffles, easter eggs & white chocolate wedding cake) in my blog requiring tempered chocolate to be used. Gotta press on with it, don’t I?

.

And besides, I had this impelling will to write this to give any assistance I can to the people looking for this type of information on the world-wide-web. – Because when I was self-teaching chocolate-making several years ago, I used to surf the web day-on-end to find useful introduction to tempering, but never had any luck! So maybe…, my contibution here would help out someone somewhere who’s in those same shoes I was back then!
.

One note to people new to tempering is that this technique is quite advanced. You’d certainly be practising this again & again. But don’t give up, don’t give up. You can use the same chocolate again to re-temper (unless it’s burnt). And cetainly don’t go spending silly money on automatic tempering machines which are notoriously temperamental.

After a dozen or so go’s, it’ll be written in to your body, straightforward like riding a bicycle, & you’ll be laughing about why it was so difficult in the first place.
.
– – – – – – – – – – – – – – – – – – – – – – – – – – – – – – – – – – – – – – – – – –

.

WHY :: The reason for tempering

.

‘Tempering’ is a word to describe the very particular method of controlling the temperature of your melted chocolate.

.
When you melt down chocolate, the chain of cacao butter crystals become intrinsically unstable and loses its neat formation. Controlling the chocolate with certain precise temperature (tempering) stablizes back the crystals that went haywire.

.

The chocolate with the temper treatment will have the most beautiful glossy sheen that screams sophistication & a crisp snap when broken.
.

Chocolate needs to be tempered if you want to use it as-is, or for moulding (de-moulding would be easier as the chocolate will shrink), for coating your bonbons, & making chocolate decorations.

.

If you allow your chocolate to solidify without tempering, or after inadequate tempering, you’d notice that you’d get the most aestheticly awful looking end-product with white streaks called ‘fat bloom’. Not only that, you yourself would be losing your ‘temper’ (excuse the pun! Had to say it didn’t I…) because it takes absolute ages to harden…

‘Fat bloom’ is a term used to describe the marks on your chocolate when the natural fat from the cocoa butter has displaced to the surface. Note it could also appear when you have nuts or nut oil in your bonbon filling. The nut oil will slowly migrate to the surface over time.

.

Please note that improper storage with high humidity would also un-temper your chocolate, & unapetizing marks such as ‘fat-bloom’ & ‘sugar bloom’ would appear on the surface.

‘Sugar bloom’ = the splotchy sweat marks after the chocolate had been in contact with moisture. The moisture dissolves the sugar present in your chocolate & when that dries, the dissolved sugar crystallizes leave marks behind. Also worth remembering that sugar bloom may occur when chocolate encounters sudden temperature fluctuations, such as when removed from the cold fridge & then left open in a room. This is because it condensates moisture from the air.

.
– – – – – – – – – – – – – – – – – – – – – – – – – – – – – – – – – – – – – – – – – –
.

With WHAT :: The indispensable equipments

.

  • Mixing bowls
  • Spatula
  • Digital probe thermometer, to constantly check the temperature of the chocolate. Once you’ve mastered tempering, you’ll ‘just’ know how the temperature of you chocolate is doing, & eventually & quite naturally this equipment will become redundant for you!
  • Marble slab, larger the better. In the kitchen where I did my short apprenticeship, they had a slab that was huge – like around A0 size – it was too heavy for me to carry. The size I use in my kitchen is A3 size, which I think is the minimum size you’re required to have to do tempering on. Anything smaller you’d be encountering lots of over-spilling from the sides. – If you’re finding getting a marble slab a problem (I got mine from the local run-of-the-mill household goods store), I have heard that alternatively, you can try use a very clean & dry stainless steel surface, that is, if you don’t mind the potential scratch marks!
  • Stainless steel scraper & palette knife for pushing, spreading & scraping the chocolate about on the slab. If you’re looking to purchase what the proffesionals use, try Keylink, a good UK supplier I’m constantly using for my chocolate making.
  • Double boiler. To initally melt down your chocolates & then to keep the tempered chocolate at a constant & optimum temperature while you’re doing your chocolate work, such as dipping your truffles. I use a machine called Caloribac (purchased from Keylink). And oh, please don’t waste your time with doing a bain-marie over your hob (although keep in mind that this is purely just ‘my’ opinion!). I’ve tried doing that, & I managed to spill water in to my bowl of chocolate when I clumsily handled the extremely hot bowl with my oven gloves. Doh! And you can forget about putting the bowl back on the hob to keep the tempered chocolate at a constant temperature – It’s really hard to gage precise temperature control over it. You’re likely to lose the temper & have to re-do the whole tempering process again…

.
– – – – – – – – – – – – – – – – – – – – – – – – – – – – – – – – – – – – – – – – – –
.

HOW :: The tempering methods

.

There are three methods.

The ‘seeding’ method.
The ‘icy water’ method.
The ‘marble slab’ (tablage) method.

.

x x x x x x x x x x x x x x x x x x x x x x x x x x x x x x x x x x x x x x x x
.

The ‘seeding’ method:

.

Note, for this you need a supply of tempered chocolate, as the whole idea of the method is to introduce (‘seed’) stable cacao butter crystals to unstable liquid chocolate.
.

1. Put aside 1/3 of the chocolate & melt the rest. Melt until the temeprature of the liquid reaches:

55 ºC (130 ºF) for dark chocolate
45 ºC (110 ºF) for milk chocolate
40 ºC (100 ºF) for white chocolate

.

2. Take it out of the double boiler in to a mixing bowl.

.
3. Deposit the 1/3 you kept aside.

.
4. Slowly mix it in (so as not to create air bubbles in your mixture). Constantly keep check on how the temperature’s doing. You need the temperature to go down to the following numbers before using it for your chocolate work:

27 ºC (81 ºF) for dark chocolate
26 ºC (79 ºF) for milk chocolate
25 ºC (77 ºF) for white chocolate

.

x x x x x x x x x x x x x x x x x x x x x x x x x x x x x x x x x x x x x x x x

.

The ‘icy water’ method:

.

It’s a good way to temper on a Summer’s day when the kitchen is too warm.

.

1. First melt all your chocolates to the following temperatures:

55 ºC (130 ºF) for dark chocolate
45 ºC (110 ºF) for milk chocolate
40 ºC (100 ºF) for white chocolate

.

2. Take it out of the double boiler in to a mixing bowl.

.
3. Place this bowl in a larger bowl with cold water & ice. 10 to 20 seconds at a time. It’s a good idea to place a pastry ring or anything similar in the water bowl for the chocolate bowl to rest on so that it doesn’t slip around & risk pouring water in to your chocolate by mistake.

.

4. Spatula constantly, especially the sides & the bottom of the bowl where it cools quicker.

.
5. Bring the temperature DOWN to the following:

27 ºC (81 ºF) for dark chocolate

26 ºC (79 ºF) for milk chocolate

25 ºC (77 ºF) for white chocolate

.

6. Then place your chocolate bowl over another bowl of warm water, approx. at 35 ºC (95 ºF). Do this to bring the temperature UP to the following. Make sure you don’t go over the suggested figures or you’ll lose the temper:

30 – 32 ºC (87 – 89 ºF) for dark chocolate
29 – 31ºC (85 – 88 ºF) for milk & white chocolate.

.

x x x x x x x x x x x x x x x x x x x x x x x x x x x x x x x x x x x x x x x x
.

The ‘marble slab’ (tablage) method:

.

1. First melt all your chocolates to the following temperatures:

55 ºC (130 ºF) for dark chocolate
45 ºC (110 ºF) for milk chocolate
40 ºC (100 ºF) for white chocolate

.
2. Take it out of the double boiler in to a mixing bowl.

.
3. Pour 2/3 of it on to your marble slab. (Leave the remaining 1/3 in the mixing bowl. – Make sure you spatula down the sides of the bowl, you don’t want to have thin layers of chocolate drying up on the sides of the bowl as you work on your marble)

.

4.
Using your palette knife, spread it across your marble.

.
5. Use both palette knife & scraper to bring the chocolate in to a mound in the middle again to keep the temperature of the mass uniform.
.
6. Repeat steps 4 & 5 (spread & regroup) while constantly checking the temperature. (If you’re fortunate to have a large marble slab, you’ll be tempering much quicker if you try shifting your scraping work from one end of the slab to the other. That way you’d always be using the cool surface that hadn’t been warmed up with chocolate yet!) Make sure you’re not introducing air bubbles to the liquid as you work it.
.
7. Bring the temperature down to the following:

27 ºC (81 ºF) for dark chocolate
26 ºC (79 ºF) for milk chocolate
25 ºC (77 ºF) for white chocolate

.

8. Pour back this chocolate in to the bowl where you’ve left the other 1/3. (At this point you’ve got to work quickly. The chocolate is rapidly cooling down as we speak!)
.

9. Slowly mix the two mixtures with your spatula. Make sure you thoroughly mix.
.

10. After mixing, the chocolate should reach the following temperature:

30 – 32 ºC (87 – 89 ºF) for dark chocolate
29 – 31ºC (85 – 88 ºF) for milk & white chocolate
.

x x x x x x x x x x x x x x x x x x x x x x x x x x x x x x x x x x x x x x x x
.

Top Tips:

.

Take time melting your chocolate. There are 6 elements to cacao butter crystals, which has different melt points, & you want to make sure you break it all down. You’ll also get a thinner coating on your bonbons.
.

Don’t go over the suggested temperatures when melting. The cassein & the milk protein in the chocolate will burn. And don’t go too low than the suggested temperature when you’re doing your chocolate work either – you’d end up with a layer of coating that’s too thick.
.

Never artificially cool the marble slab, as it’ll get too cold. Tempering must be done by gradually cooling.

.

Remember, the temperature & the humidity in your kitchen would seriously play a big part. Forget tempering in the Summer unless you’ve got a room cooler.

.

I personally find the ‘icy-water’ method risky & fiddly. Not only there’s the danger of getting the water in the chocolate, the temperature of your chocolate becomes very uneven.

.

Do use couverture, chocolate with real cacao butter, with atleast 31% of it – do not ‘coating chocolate’.

.

It’s fiddly to temper a small amount of chocolate. Atleast half a kilo is required.

.

A good way to test wether you’ve tempered correctly is to dip a clean knife in to it & pop it in the fridge for half a minute. If you see a set coat of shiny chocolate, you’ve got it right!

.

x x x x x x x x x x x x x x x x x x x x x x x x x x x x x x x x x x x x x x x x
.

Well, I hope it’s been of any help… Good luck… As for me, I’m off to bed…

May 21st, 2007

A bit of press again!

ukjack_article22.jpg

Last week UK Jack (Japanese newspaper circulating in London) featured Broadway market. Among the shops & stalls that they mentioned, they’ve also mentioned me! Thank you UK Jack! It’s amazing y’know, the power of media… – there were definately a much larger chunk of Japanese visitors last Saturday! I had many Japanese customers approaching my stall, telling me that they came because they saw the article!

.

This week I decided to take time off the market. The weather forecast was rain, & I had no pre-orders. I felt I could do with putting my feet up & actually fully spend my Friday & Saturday with my son. It also meant my parents can have a time off from looking after him on the Friday too, which they so totally deserve…
.

So how did I spend my time off? Well, er, nothing special really. Went swimming, & also to a shopping mall, & hang around the toy stores. I did a not-so-little (!) retail therapy for myself while he was happily asleep in the pram. Bought mainly clothes… Coz y’know what? I flippin’ deserve it – the last time I bought any garment for myself was around Xmas time!
Jeez, I tell ya, my old-self from the singleton dayz would be screaming like Munch in disbelief of how I’ve changed! I used to go clothes shopping ‘Atleast’ every month, & come home with bags n’ bags of beautiful stuff…

May 13th, 2007

Coco&Me Wedding Cake 01

cocome_weddingcake01.jpg

(Three tiered chocolate butter cake with raspberry ganache layer. Coated in pâte à glacer, & decorated with couverture slabs)

cocome_weddingcake02.jpg(I wish I could show you what the inside looks like… Obviously, I can’t cut in to it… Now I know I should’ve taken a picture of a slice when I did the test-bake…!)

.
Last Thursday I made a 3-tier wedding cake for Sue’s daughter Hannah. Sue has a stall close to mine, & she is one special lady, always looking out for me, buying cakes from my stall when times are tough on a rainy day, & always when she has guests that weekend. She would also bring me all sorts of “finds” that I might like (& I do!) from car boot sales & fairs. Cake plates, vintage cadbury’s toy car, chocolate moulds, vintage childrens books for my boy, beautiful vintage cake pillars… I really like her. Don’t get me wrong, it’s not because she gives me things! It’s because she is a warm person, & I think it’s important to have nice people like her around you, to remind you to mellow out & breathe a bit, because there’ll be someone there for you. And so I was honoured to be asked to make the wedding cake for her daughter. I’m happy that my first-ever wedding cake (which means so much to me) goes to such a good home!
.

Yesterday Sue & Hannah gave me the most wonderful gift. The cake stand that Hannah used for her wedding! I couldn’t believe it. The stand had been in their family for a very long time apparently, & it was Hannah’s strong wishes that it be used for her wedding cake. To give me such a special stand that means so much to them… I was honoured, & moved.

.

Do you remember I did a test-bake of it earlier this year? (check this link out to read a post from that time). Well, finally it was the time to do it – & the good thing is, I was not nervous about it atall, thanks to that test-bake. I knew exactly what to do, how long it’ll take, & importantly, how delicious it tastes. I tell ya, it’s just miles better than the traditional fruit cake kind (yuk, I never liked ’em) with overly thick icing that sticks to the back of the teeth.

.

Here is the recipe for the Coco&Me Wedding Cake. (although unfortunately, I do not have the ‘process pictures of it as I promised to do – Sorry guys, maybe next time – I just did not have the time nor the will to tinker with a camera on a big baking mission like this – especially when I had the pressure of meeting the deadline of 7pm handover!)
.

For bakers who would rather not have the trouble of tempering your own chocolate slabs, I think a good alternative is to use store-bought chocolate thins such as ‘Jules Destrooper Chocolate Thins’ or anything rectangular!

.

Some top tips when baking:

– Please read through the recipe thoroughy beforehand. That way there’ll be no surprises!
– If you do not have a 6 inch tin, do what I did – bake in a smallest that you do have (I had a 7 inch one) & cut a 6 inch cake out of it! Just remember to increase the recipe abit to compensate for it!
– And if you want to know about how to successfully whip egg whites, or how best to cream the butter, click this link for a thorough write up about it.
– Always buy some extra eggs! Just incase you brake one by mistake…
– Make sure your eggs are also at room temperature. Adding ‘straight out of the fridge’ cold yolk &/or cold meringue in to your cake mix would seize it up!

.

x x x x x x x x x x x x x x x x x x x x x x x x x x x x x x x x x x

.

Feeds: 25 to 30 people
Difficulty: Intermediate, if you substitute the chocolate slabs with something else such as store-bought chocolate thins.
Time to make: 3 to 5 hours (it depends on how competent you are at baking!)

.

x x x x x x x x x x x x x x x x x x x x x x x x x x x x x x x x x x

.

CHOCOLATE SLAB RECIPE:
Before you bake the sponges, make enough chocolate rectangles, clingfilm them & store in the refrigiator. I used over 60 slabs for the decoration. But I made alot more to make sure I had enough to hand ‘just incase’. The measurement was 3cm x 8.5cm.

.

To make the slabs:

1. Temper 1kg white couverture.
2. Pour it on to a big sheet of clingfilm that’s crease-free, layed out on your table. Spatula the chocolate surface to 3 or 4mm thickness.
3. When semi-set, use a sharp knife & a clean ruler to cut to size.

.

x x x x x x x x x x x x x x x x x x x x x x x x x x x x x x x x x x
.

THE CHOCOLATE SPONGE RECIPE:

.

Ingredients:

450g unsalted Butter – room temperature
450g dark Chocolate – melted
160g castor sugar (for step 3 in the recipe)
23 egg yolks
225g almond powder
egg whites 23 eggs worth
300g castor sugar for mixing with the egg whites to make meringue

450g plain flour
.

You will need the following items:

6inch (15.2cm) round springform baking tin
8inch (20.3cm) round springform baking tin
10inch (25.4cm) round springform baking tin
Cake cards for the three sizes – It has to be thin, not drums.
18 x thin wooden BBQ skewers cut precisely to 8.5cm high
2 x extra large mixing bowl
3 x cake racks
A long piece of clean string for tying around each tier to support the slabs while it sets

.

And prepare these before your baking frenzy:

Pre-sift the flour.
Have the chocolates melted in a seperate bowl.
Preheat oven to 180 degrees.

Butter the baking tins. Sift flour in to it so that it sticks to the bottom & the sides. Tap out excess flour, & store the prepared tins in the refrigiator until needed.
.

Method:

1. In a large mixing bowl, cream the room temperature butter.
2. Pour in the melted chocolate. Constantly whisk while doing so.
3. Whisk in the sugar.
4. Whisk in the egg yolks.
5. Whisk in the almond powder.
6. In a seperate bowl, make stiff meringue (To read up on how to obtain a perfectly whisked up meringue, click here).
7. Fold half of the meringue in to the cake mixture from step 5.
8. Sift in all of the flour & fold.
9. Next fold in the rest of the meringue.
10. Divide the cake batter in to the three cake tins.
11. In to the 180 degree oven it goes. (Pre-heated ofcourse!)
12. The ‘bake time’ for each size tin will be different. Because of this, you’ll be taking the tins out at different times. Please use the following as a guide, but please also do a ‘skewer test’ (inserting a skewer in the centre to see if it comes out clean).

6 inch = take out after 30 minutes

8 inch = take out after 50 minutes

10 inch = take out after 1 hour

13. When baked, take the tin sides off & cool them completely.

.

x x x x x x x x x x x x x x x x x x x x x x x x x x x x x x x x x x

.

RASPBERRY GANACHE FILLING RECIPE:

.

80g unsalted butter (room temperature)
1000g dark chocolate (preferably 70% cocoa solid, in button form for quick melt, or finely chopped from a bar – although bear in mind that chopping it up takes more time to do than you think)
800g fresh double cream
200g raspberry jam

.

1. Boil the cream in a pot.

2. Pour hot cream over the chocolate & the jam in a mixing bowl.

3. Leave to stand for 10 seconds. Then use your spatula to mix it in slowly from the centre, incorporating more cream from the sides as you do it.

4. Mix in the butter. Mix until it dissolves (if you still have lumps left, give it a 5 second wiz in the microwave).

.

x x x x x x x x x x x x x x x x x x x x x x x x x x x x x x x x x x

.

Pâte à Glacer (coating chocolate) Recipe:

.

2kg White couverture chocolate
160g pure vegetable oil

.

1. Melt chocolate in a mixing bowl.

2. Add oil. Mix together.
3. Place the mixing bowl in a ice filled water bath & keep stiring the chocolate/ oil mix with your spatula. Make sure you stir from the bottom of the bowl, where it is most cold. Keep stiring til it thickens.
4. Place the bowl in a hot-water bath for a very few seconds to bring the temperature up again.

5. Now it is tempered for coating the sponge.
.

x x x x x x x x x x x x x x x x x x x x x x x x x x x x x x x x x x
.

CAKE ASSEMBLY:

.

1. Cut cake in to two horizontally, & sandwich 5mm layer of the raspberry ganache.

2. Put the sandwiched sponge on a cut-to-size cake card.
3. Place the first sponge to be coated on a cooling rack, on top of a clingfilmed tray.

4. Pour some pâte à glacer over the cake. Smooth it down the sides, to cover it completely.

5. Sit down. Get comfortable. Take your time sticking one slab at a time to the side of the cake. Make sure to overlap each one slightly. Once you’ve stuck it all on, tie a string around it to support them. Now is your chance to really make sure each slab is straight. When you’re happy, pour more pâte à glacer in the centre of the sponge & let it fall down to all the sides. This would help fill any gaps inbetween the sponge & the slabs.

6. Repeat these steps for the other two tiers. Note, you can re-use the pâte à glacer that had fallen to the tray again to cover the next sponge.

7. Once you’ve done all three, next skewer some wooden sticks in to the bottom two layers. These would act as plinths to hold the weight of the next tier up. More skewers mean more stability, but also means lots of holes on your slice. Placing nearer the outskirt also gives you stability, but make sure it is not visible when assembled. Place one in the middle, & then symmetrically skewer in a circle.
8. Finally tower up your tiers & et voila! Phew… sit back, you can relax now, & enjoy the monumental view, possibly with a beer because you deserve it!
.
x x x x x x x x x x x x x x x x x x x x x x x x x x x x x x x x x x

April 23rd, 2007

Food Hygiene & Awareness Part 1 – Effective hand washing

Coco&Me_effective_hand_washing_pics

.

This week I’d like to spend some time writing about the importance of high standards in food hygiene. It is obviously an essential issue to me as a food maker & seller, since, if my customer were to get food poisoning/ or find foreign objects in the product, I would get prosecuted (!), let alone get a bad reputation, I’d have to quit the stall & put an end to my passion!
.

The reason why I decided to write about this rather difficult subject here is so that I can revisit what I have learnt (I did a short course on Food Hygiene & obtained a certificate prior to doing my stall), & also to share this information with you, as pretty much all of it is of a beneficial piece of advice that can be used in anyone’s home.
It’s an ultra lengthy subject, covering topics such as correct food storage, cleaning, etc, so I’m aiming to write up about these in bit by bit series!
.

x x x x x x x x x x x x x x x x x x x x x x x x x x x x x x x x

.

So first off, lets wash our hands before we handle our food.

Sounds like a piece of cake? Not worth covering as a subject? Well please persevere & read on, you’d be surprised to know how it is worth covering as a first subject, aswell as to fully master the art of hand washing! When I did my hygiene course, I myself was surprised about how little I knew about how to effectively & correctly wash my hands!
.

Some key facts to persuade you to wash correctly:

  • Hands are the main route for transferring food poisoning bacteria to your food
  • Effective & frequent hand washing prevents the spread of cold & flu
  • Even though hands may appear to be clean, they may carry germs or microorganisms that are capable of causing disease
  • It is important to know how to wash properly because as you can see from the diagram below, there are parts that are often missed:

where_its_missed.jpg.

Wash hands when:

  • entering the kitchen
  • before preparing food
  • after touching raw food such as meat, eggs
  • after touching waste or the bin
  • after cleaning
  • after blowing the nose, even if you’ve used layers of tissue to do so
  • after touching an animal
  • after changing a nappie
  • after using the telephone
  • after smoking
  • often when someone in your home is sick

.

Step-by-step:

  • 1. Remove rings & watches.
  • 2. Wet hands & wrists thoroughly with warm running water.
  • 3. Use soap & lather thoroughly.
  • 4. Rub hands together – Right over left, left over right.
  • 5. Palm to palm, interlace your fingers & continue scrubbing by sliding your fingers back and forth. Clean under your nails as well. Steps 4 & 5 should take atleast 20 seconds. For a visual guide to this, see my pictures below.
  • 6. Rinse the hands with clean running water thoroughly.
  • 7. Use disposable paper towel for drying (Don’t use a common hand towel – remember that germs thrive on moist surfaces). Make sure you dry your hands thoroughly too, as damp hands also spread bacteria.
  • 8. Turn off tap using the paper towel, to protect your hands from recontamination.
  • 9. If you were washing in the rest room, use a clean paper towel to open the door.

Step by step pictures of how to wash hands effectively

.

I found a quicktime movie of hand washing on a medical site, so click here to view their page.

.

On Thursdays & Fridays (my weekly baking days), I probably wash my hands atleast 50 times… Which, despite it being undeniably total neccesity for hygiene sakes, the down-side of it is it strips moisture and the natural oil from my skin, & it’s always dry n’ itchy… I feel as though my hands alone have aged dramatically since I started the stall… I use hand cream if I remember to do so – but I refuse to wear gloves to bed like my mom does – that’s like admitting that I’m turning in to real mumsy character…!

April 17th, 2007

An article about me on UK JACK!

Coco&Me article clipping from UK JACK newspaper

.

On Wednesday last week, a Japanese Newspaper called UK JACK (a weekly publication circulating mainly in London) had published a small article about me! Click this link to see the jpeg in full size.
;-)

Many thanks to Naoko-san, Kunichika-san, & Chie-san for making this happen.

;-)

So for this week’s blog entry, I’ve translated the article in to English:

.

x x x x x x x x x x x x x x x x x x x x x x x x x x x x x x x x x x
.

THIS WEEK’S PERSONALITY

.

What prompted you to come to the UK?

I came to this country when I was 6 due to my father’s work. At first it was only meant to be for 3 years. But have now approached the 25th year!

.

What is your activity here?

After graduating with a Graphic Design degree from St. Martins, I worked as a Designer for 6 years. Upon becoming pregnant, I had a lot of time to spend at home, which was when I realized my passion for making desserts. This passion saw me through a hobby to now regularly selling them!

.

What is your motto?

“To live each & everyday to the full”. Even when I’m feeling tired, or feeling down, I try to turn thoughts in to action.
.

What do you love & hate about yourself?

I like the part of me which obsessingly pursues what ever it is I’m ‘in’ to. But hate the part of me that is easily flustered & is stubborn/ obstinate.

.

What do you love & hate about the UK?

It’s very easy going here. I like that. But I dislike that there is a big gap when it comes to the quality of state schools available, & well-to-do families with more money to spend (ie: to afford to live in a good school catchment area) get better education for their children.
.

What surprised you in UK?

Rice pudding.

.

What three words describe London?

Relaxed, bad-transport & dirty…
.

Which tourist destination did you like?

A small town called Padstow in Cornwall, & it’s surrounding areas. It’s quiet & peacefully still as if time had stopped.

.

When you want something delicious in UK…

I buy fresh & yummy ingredients at Broadway Market & cook at home!

.

What did you think was ‘good/ inspirational’ recently?

Louis Hamilton of F1. His eyes remind me that of my son’s. I wish for my son to be able to have a big dream, have the strength to pursue it & ‘get it’, just like Hamilton did.

.

Anything made you angry recently?

I don’t get angry much.
.

Who do you respect?

The Head Pastry Chef at the Waldorf. He gave me the astonishing opportunity to work in a five-star hotel kitchen – despite the fact I had no professional patiserrie experience what-so-ever! People like him who give chances to others selflessly is inspiring.

.

What do you treasure?

A little embarassing to say, but it’s the love of my family…!

.

What do you miss from Japan?

Every Japanese people I know says MOS BURGER is really good, so I’d LOVE to eat it one day!!

.

What would you like to take back to Japan?

I’d like to introduce my friends in Japan to Porridge. It’s delicious with honey…

.

What would you like to do next?

I’d love to turn my recipes & stories I write in my blog in to a book. I might even want to write a fictional novel… And when I have more time, develop the Coco&Me brand!

.

x x x x x x x x x x x x x x x x x x x x x x x x x x x x x x x x x x

« Previous Entries   Next Entries »