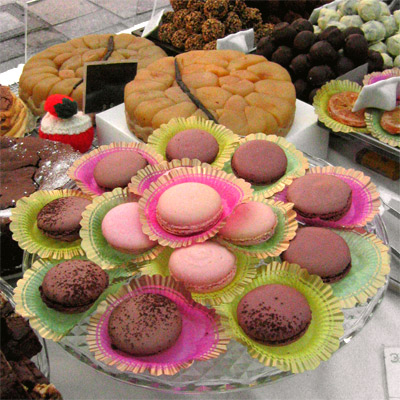
(The paper discs make the display colourful despite it being only two types of Macarons!)
.
Macarons. Macarons. The Heavenly Macarons.
.
They are what dessert foodie’s Heaven is made out of. Delectable morsels that have a smooth domed surface, which encases a texture that can only be described as soft, gooey, slightly chewy… Mmmm… Which you’d be munching slowly… savoring every bite… with the ganache chocolate centre combining in your mouth… Mmmm… But then… will be finished before you know it! Ahh… Just imagine Homer Simpson’s drooling passion for his Donuts – that same passion applies to me about Macarons…
.
I sell pink Macarons (with raspberry jam + ganache centre) & chocolate Macarons (with dark ganache centre) at my stall. I would love to sell many different coloured ones, as one of the attractions of these morsels is the array of colours it could come in, irresistably displayed like cute buttons. But work-time-wise, I am at my limit. I already make more than ten types of cakes every week, & chocolate truffles, etc, on top of that… Pink & chocolate colours are by far the most popular at the market it seems, so I’ll stick to those colours for now!
.
So without further ado, here is the recipe(s) for Macarons.
I’d be explaining the base recipe which you’d use to create any colour Macaron you’d like. And then I’ll also list the ingredients list for Chocolate Macarons, which requires you to swap some of your almond powder with cocoa powder.
.
Warning:
… … This dessert is very difficult to master. A perfect Macaron MUST have ‘THE FOOT’ which is the raggedness around the edges. It mustn’t come out cracked. It must be round. Each Macaron must be of same size.
… … So I’m afraid it’s all about trials & tribulations! I’m yet to meet anyone who’d made it perfectly from their first go. It took me numerous attempts with recipes from many sources to get it looking alright enough for me to sell. To have to try again & again til perfection is a test of endurance for your love of Macarons. Just remember, every single step in the recipe is important, otherwise, sorry to say, you’re doomed for failure.
… … Also, please remember that everyone’s oven is different. Is it fan or convection, is it pretty old & not precise with temperature, does it have heat spots… (I have a heat spot on the right for example). Every oven has it’s own knack. So I recommend the use of an oven thermometer! This little biscuit requires preciseness.
.
Although despite these warnings, please don’t be intimidated by its complexities. Try! & besides, you’d always be able to eat them test batches for yourself, right!? (Like I do). Surely no harm done… ;-)
.
x x x x x x x x x x x x x x x x x x x x x x x x x x x x x x x x x x
.
Macarons Recipe:
Makes approximately 16 sides (but all dependent on how big you pipe it)
.
Ingredients:
- 50g Almond powder
- 90g Icing sugar
- Liquid food colouring (optional)
- (and for the meringue the following:)
- 60g Egg whites (about 2-3 eggs worth), at room temperature
- 30g Icing sugar
- For the centre: jam, buttercream, or ganache (5:4 ratio of cream & chocolate. Read below for the recipe)
.
Prepare:
a. Sift almond powder & the icing sugar TWICE. It’s your chance to get rid of the not-so-fine almond powders.
b. Line baking tray with cut-to-size baking paper (or prefably a silpat if you’ve got one). Place this tray on top of another tray (Doubling up the tray delays the heat cooking the Macaron from the bottom. This insures that the outer surface is dried up first before the inside starts to lift it up. This is what makes that all important ‘foot’ & the smooth surface that is not cracked).
c. Have a piping bag ready.
.
Method:
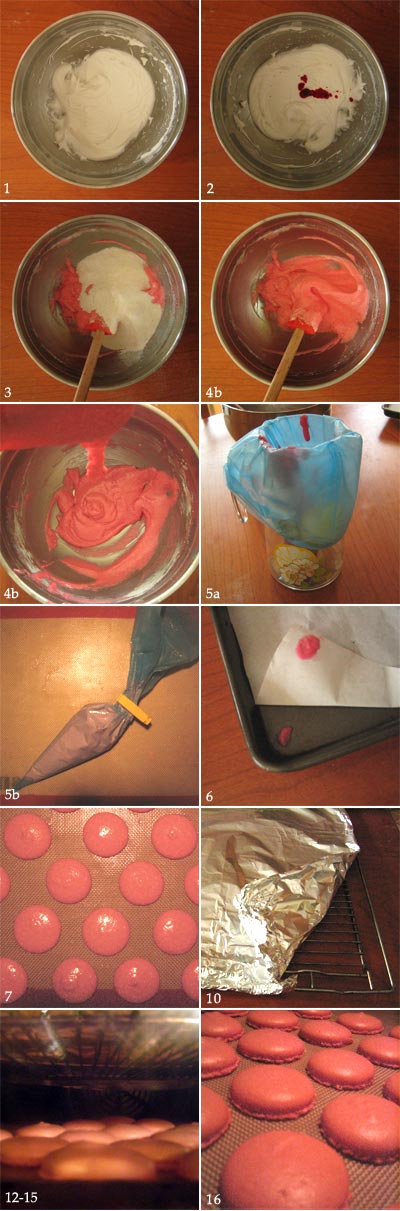
- 1. Whisk the egg whites with the icing sugar. Whisk until stiff peaks.
- 2. (Optional) Add food colouring (Literally droplet at a time, as these droplets paint the whites unapetizingly vivid if you’re too generous. But also remember that the colour intensity will be slightly less once you incorporate the dry ingredints later!). Mix it in to the whites.
- 3. Deposit the pre-sifted dry ingredients (almond powder & icing sugar) in to the white in one go.
- 4. Use the spatula to fold it in. Once all the dry ingredients has been incorporated & dissapeared, you must check wether you’ve reached perfect consistency. Test by lifting up the dough with your spatula – HOW DOES THE DOUGH FALL? If it is not falling down in ‘GENTLE’ continuous ribbons, try mixing it a tiny bit more. The technique for mixing at this point is to “fold & press” your spatula against the side of the bowl to deflate the air out of the whites. Do this til you’ve passed this vital ‘dough fall’ test. But just remember, don’t over mix it either… (This folding process is called ‘macaronage’. This is the most tricky bit of Macaron making. I find that you can only know how much one should fold by practising again & again…)
- 5. Spatula the mixture in to a piping bag. (tip: having the bag over something like a juice decanter like the picture below is much easier than the professional way!)
- 6. (skip this if you’re using silpat) Scrape the left over mixture from the now empty mixing bowl & smear it under all four corners of the baking paper. It’ll act as a glue to stick the paper to the tray.
- 7. Pipe 3-4cm rounds on to the baking paper. Make sure to leave atleast 2cm around it as it will spread later.
- 8. Once all piped, drop the tray horizontally on to your work surface to knock some air bubbles out & to spread the dough out a bit. (If you’re doing this at night, & you’re worried you’d wake your kid upstairs (for example), layer some kitchen towels on the work surface to dumb the sound!)
- 9. Leave it aside for 20-30 minutes. This is to dry the surface of your macarons. After the time is up, check how dry it is by gently touching the surface. Does the dough stick back? Leave it aside for another 10 minutes. Once it’s not sticky, proceed to the next step.
- 10. Prepare your oven shelves – you’d want to place your trays on middle shelf. I’d like to cover the shelf above it with foil so that there’s no direct heat hitting my Macarons & discolouring it brown.
- 11. Pre-heat oven to 190 degrees.
- 12. Pop your trays in. (Make sure they are doubled up!!) Sit by your oven with your oven gloves.
- 13. Once ‘the foot’ graciously appears (it’s usually after 4 – 5 minutes), & has reached it’s maximum height, open the oven & quickly but safely take the bottom tray away (meaning don’t double it up anymore). Place the macarons tray back in the oven.
- 14. Change the temperature dial to 170 degrees.
- 15. Bake it for another 5 – 7 minutes. If the colour of the surface is starting to brown, turn the oven off, keep the door shut, & bake it with the remaining confined temperature.
- 16. Leave aside to cool together with the hot baking tray.
- 17. Once cooled, you’d have to remove it off the baking paper. To do this, you dab water on the baking paper under each Macaron & wait a few seconds. The paper should peel off easily without giving. Just do this process slowly & patiently – these Macarons are delicate stuff (if you’re using silpat, just use a knife & slide them off). Now, you can either go to the next step, or decide to store these discs in a consealed tupperware – it’ll keep for several days.
- 18. Pair up the Macarons.
- 19. Pipe the ganache centre mixture (Please read the ganache recipe below) or any other mixture of your choice & sandwich the Macarons together.
- 20. Place in a tupperware & store it in a refrigerator.
- 21. Best eaten the next day!
.
x x x x x x x x x x x x x x x x x x x x x x x x x x x x x x x x x x
.
1:1 Ganache centre recipe:
.
Ingredients:
50g of fresh double cream
40g of dark chocolate
1. Have the chocolate ready in a mixing bowl.
2. Heat cream in a smallest saucepan you have. Bring it to simmering point
3. Pour the hot cream over the chocolate.4. Leave to stand for 10 seconds. Then use your spatula to mix it in – SLOWLY – from the centre, incorporating more cream from the sides as you do it.
.
x x x x x x x x x x x x x x x x x x x x x x x x x x x x x x x x x x
.
Chocolate Macaron Recipe:..Ingredients:
45g Almond powder
90g Icing sugar
5g Cocoa powder
Red liquid food colouring
(and for the meringue the following:)
60g Egg whites (about 2-3 eggs worth), at room temperature
30g Icing sugar.Method:
Please follow the basic recipe above. The red food colour will add that extra richness to the chocolate colour. To make green tea Macarons, you can user the same measurements as this – just swap cocoa to green tea powder, and omit the red colour.
.x x x x x x x x x x x x x x x x x x x x x x x x x x x x x x x x x x.
“AHHH. Donuts Macarons… What can’t they do.” – adaptation quote from Homer Simpson…!
.Update 20.06.07
ps: Which is the correct way to spell – macaron or macaroon? The original french version is ‘macaron’. But the english version seems to be ‘macaroon’… Pronounced with the ‘oo’ too. But doesn’t that point toward the American Coconut Macaroons…, not the French kind? If anybody knows, please advise me!!


