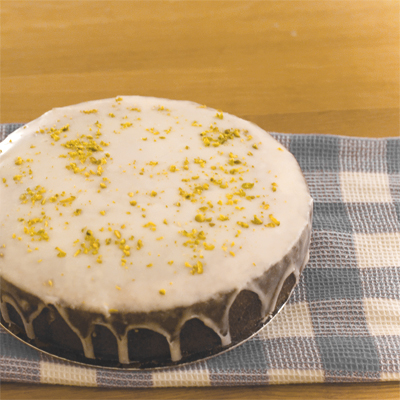
(For the extra glossy icing, I put the iced cake back in to a pre-heated oven of 230 degrees for just under 1 minute. – By doing this, the moisture evaporates a little & the icing becomes slightly crystalized, & shinier!)
.
.
I’m the type that take cook books to read in bed. I have piles of them by the bedside.
I read through these books like a bible. And when I find recipes that are worth careful reading, I imagine every step in my mind… – I imagine what it must taste like. – And when it’s a “really” good recipe, I close my eyes & start to add or change the recipe here & there, think of how to serve them, & to whom, at what kind of occasion.
.
Imagining about food, (especially with sugary content ^^) is my all-time stress-buster. Must admit, it HAS been known to have the dis-advantage of me hoping out of bed to raid my food cupboard at times (!), but the best thing about this imagination-game is when, sometimes, my trail of thought affects the contents of the dream I am to have that night.
.
Whilst in my dream world, the said recipe gets wilder and wilder, & the story surrounding it most certainly strange, a bit like Alice in Wonderland actually. So far there was a nice guest appearance from Monsieur Hermè, who was slurping fizzy cola from a paper cup with some faces I knew from 15 years ago (that I thought I had forgotten about), critiquing the recipe in question! At a food court in a mall of all places! Lol…
.
The other night I read a recipe book in bed as usual.
.
And I got very much fixated on carrot cakes. I like ’em moist. The cream cheese frosting, a must. No raisins, but lots of walnuts. Easy on the spices.
.
By now, I was hoping to dream more about it in my dream, but my dream story must have had a twist, – because when I woke up the next morning, as odd as it may sound, my fixation was not CARROT cake anymore but LEMON cake instead.
.
When I woke up, I was like: – So that’s it. Here I am totally fixated on lemon cakes. Gotta bake it. Like, now. – But what kind of lemon cake? Should it have lemon juice &/or just zest? Which cake tin? Round? Square? How should it be garnished? Lemon Icing? Drizzled? What’s the best lemon/ sugar ratio for lemon syrup? … Hmm! It’s like trying to solve a good puzzle! I Love it.
.
x . x x . x x . x x . x x . x x . x x . x x . x x . x x . x x . x x . x x .
.
So here it is, my lemon cake recipe after numerous test-bakes & sacrificial loosened belts for the cause.
It is super moist thanks to the drizzle, & the sponge is flavoursome because some of the plain flour has been replaced with almond powder. It also keeps exceedingly well. Please take note, there’s lemony notes everywhere, what with the zest & the juice in the cake batter, the lemony-sugar syrup drizzle, aswell as more juice in the crunchy icing top. There’s the optional candied lemon strips for the garnish too. – IT’S pretty LEMON-MAD (but not in a OTT way).
.
What does sour cream do to the cake?
As well as contributing a fresh & tangy flavour that’s just a perfect addition for a lemon cake, sour cream, being an acidic ingredient, tenderizes the gluten formed in the cake batter, which in effect, results in a finer, dense & moist sponge.
.
Why clarify the butter in the cake recipe?
When you gently melt the butter, the 15% water content evaporates & you are left with three layers, separated by density. The top layer is fine foam of whey proteins that floated up, the middle is clear highly purified liquid, & the bottom is cloudy white residue of more milk solids.
The middle layer is the “clarified butter”. It’s unique points are:
- It has a higher smoke point. It can be heated to 200 centigrade before burning (for example this is perfect for pan-frying, & for making pale coloured crepes!). This is because we’ve removed the milk solids which burns easily.
- The highly purified butter gives the cake a concentrated butter flavour. Also slightly nutty fragrance. Typically financiers, madeleines & genoise sponge uses clarified butter.
- It won’t get rancid as quickly as un-clarified butter, since the water content & the impurities had been removed.
- The cake becomes moist & tender because the butter relaxes the gluten in the flour.
To make the clarified butter:
First work out how much to melt. You should melt 130%+ of what the recipe calls for. (My lemon cake requires 100g of clarified butter, so I’ll be melting 130g.)
- 1. Melt butter in a saucepan or microwave.
- 2. Skim the foam/ froth (whey proteins) that surface with a spoon. The best way to skim efficiently is to use the back of a spoon to gently push the froth to one side of pan & then spoon it out.
- 3. Leave aside a little to let it settle in the pan.
- 4. Finally gently spoon out the clarified layer, leaving the milky residue still in the pan.
The star tip here is to have it warmer than body temperature when time comes to use it. The warm liquid will be runnier to mix better with the batter (just like how oil is gloopier when cold, but watery when heated up). Melting & separating the layers is a little extra work to do, but it will make a difference!
.
Another mundane but important tip is that you really will be better off if you weigh out all the ingredients beforehand.
.
x . x x . x x . x x . x x . x x . x x . x x . x x . x x . x x . x x . x x .
.
Lemon Drizzle Cake with Lemon Icing Recipe:
(8″ cake = 7 to 8 slices)
.
Ingredients:
(quantities for 8″ round baking tin or something similar)
200g eggs (about 4 eggs)
240g sugar
a pinch of salt (3g)
135ml sour cream
20ml of lemon juice
190g plain flour
40g almond powder
5g baking powder
100g of clarified unsalted butter (have prepared 130g to skim from)
zest of 1 unwaxed lemon
For the lemon syrup to drizzle:
50ml lemon juice
60g castor sugar
For the lemon icing:
35ml lemon juice
200g icing sugar
For the garnish:
skin of 1 unwaxed lemon
50g sugar
roughly chopped “extra green” pistachio
.
Things to prepare beforehand:
- Line the bottom of the baking tin with baking paper.
- Butter the baking tin sides. Then move around some flour in it so that it clings to the sides. Tap out excess flour, & store the prepared tin in the refrigerator until needed.
- Grate 1 large unwaxed lemon & mix it with a teaspoon of sugar & leave aside ( = the sugar enhances the lemony quality/ essence). Remember, don’t grate the white pith under the yellow skin. It’s too bitter.
- Melt 130g of unsalted butter. Weigh out 100g of the clarified liquid.
- Preheat oven to 180 degrees C.
.
x . x x . x x . x x . x x . x x . x x . x x . x x . x x . x x . x x . x x .
.
Method:
.
- 1. In a large steel mixing bowl, loosely whisk 200g of eggs.
- 2. Put the mixing bowl above a pot with simmering hot water (bain marie).
- 3. Whisk the eggs with 220g sugar (added in three go’es) until light cream in colour, & thick in textureIt should be so thick that it dollops off the whisk. You’d be whisking for 5 to 10 minutes. The egg mixture would look like it tripled in quantity.
- 4. Put together 135ml sour cream + 20ml of lemon juice + lemon zest + 3g salt in a seperate bowl, then whisk it in to the egg foam. The lemon juice loosens the gloopy consistency of sour cream, & makes life a little easier to mix it on to the batter!
- 5. Sift & then fold in the 190g plain flour + 40g almond powder + 5g baking powder.
- 6. Warm the prepared 100g clarified butter to just above body temperature. Warm clarified butter is much more fluid than cold. It will merge with the cake batter better.
- 7. Take a little of the cake batter & mix it in to the butter dish. This technique will ensure that the butter mixes in evenly & quickly.
- 8. Now fold in the butter + batter mixture to the rest of the batter. Make sure it is thoroughly folded in to the batter from the bottom of your bowl, as butter is heavier than the batter, it sinks to the bottom & you’d have a weird hard layer on the bottom of your cake!
- 9. Pour the batter in to the prepared cake tin.
- 10. Pop it in the preheated 180 degree oven for 35 to 40 minutes, or until it passes the skewer test. Use a metal skewer & pierce the middle of the sponge. If it comes out clean & the tip is hot to the touch, then it is done.
- 11. While the cake is in the oven, make the lemon drizzle syrup. Simply heat 60g castor sugar with 50g lemon juice in a small saucepan until the sugar has dissolved & melted completely. (Beware! The liquid easily boils over if you’re not watchful!)
- 12. When the cake has baked, quickly de-mold from the tin & place upside down on an oven tray. The bottom will be the top of the cake. This way, you’ll get a level top surface perfect for achieving flat icing.
- 13. Place the cake-tin wall back around the sponge. This trick will keep the hot lemon syrup from spilling everywhere.
- 14. Skewer the sponge & spoon the hot syrup over it & let it soak in to the hot sponge.
- 15. (Optional) While the cake is cooling, make the lemon garnish:
– Peel the lemon skin. Make sure there’s no bitter white piths attached to the underside.
– Cut it in to thin short strips.
– Boil it in hot water for 3 minutes. Then drain.
– Put it back in a pan with 50g sugar & just enough water to cover it.
– Boil it for 6 minutes.
– Leave to cool in the sugar liquid until you need it.
- 16. Now make the lemon icing:
– Place 200g icing sugar in a small bowl.
– Pour in 35ml lemon juice & make the paste.
- 17. Place (upside down) cake on a level surface. Pour the white icing in the middle, all in one go. Let some (but not all) drip to the sides.
- 18. While the icing is still wet, garnish the top with the lemon strips &/ or chopped green pistachio.
- 19. For the extra glossy icing, put the cake back in a pre-heated oven (230 degrees) for under 1 minute. The moisture evaporates & the icing becomes slightly crystalized. This step also changes the mouth-feel of the icing from gooey to somewhat sharper.
- 20. Wait for the icing to harden. Never try to move the cake while the icing is soft as that will crack the icing surface.
- 21. Slice with a sharp knife. Wipe knife after every slice for the clean cut.


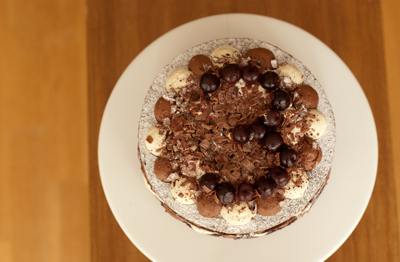 This wednesday I made a Black Forest Gâteaux.
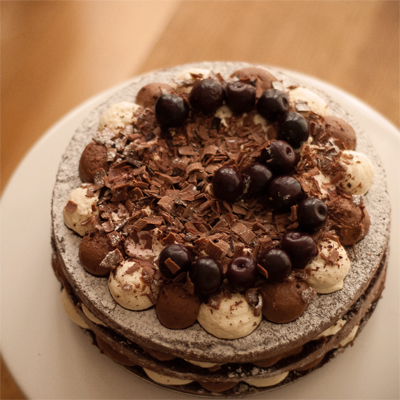 I arranged the cherries on top to spell number 3, because I baked it to take to a 3 year old’s birthday party.
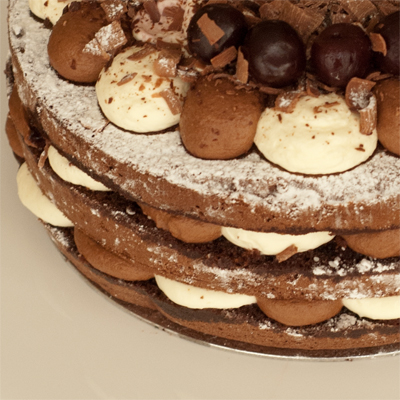 The cake was constructed with Kirsch-syrup soaked chocolate genoise sponge layers with alternately piped kirsch chantilly cream & whipped chocolate cream. There are also lots of de-stoned black cherries (Kirsch-syrup soaked) hidden inbetween the layers.
 .
. (Close up.)
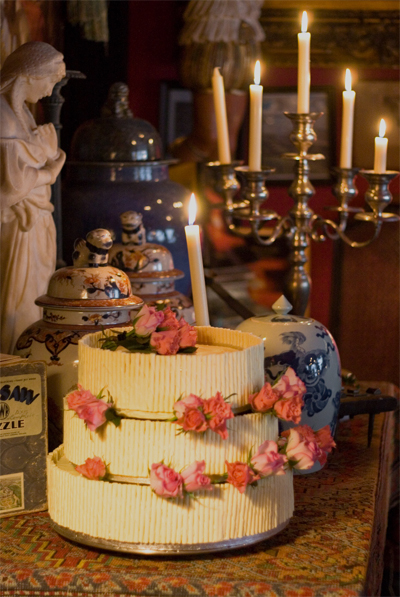 (And here is a picture of the wedding cake I made for them. – Three tier wedding cake with white chocolate cigarette surround. Inside is a dark chocolate sponge cake with raspberry ganache layer.)
 (Close up.)
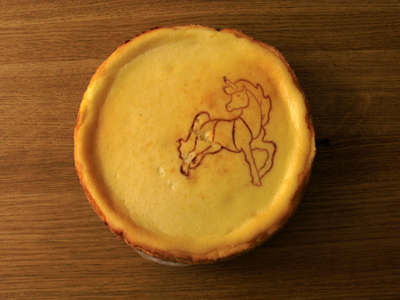 (…with unicorn pattern embossed)
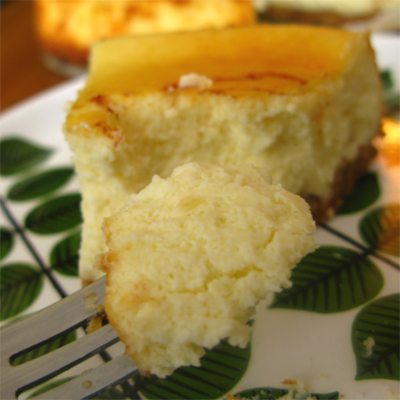 (It is ultra c
 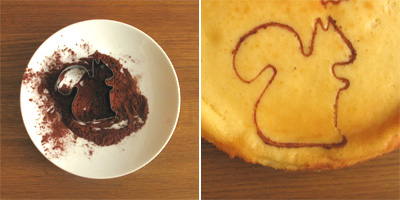 (I get asked A LOT at the market on how I do it!)
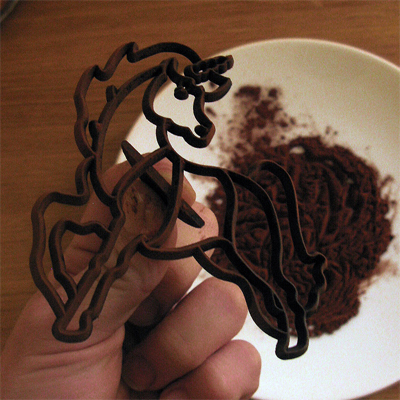 (My favorite stamp! – I love unicorns…)
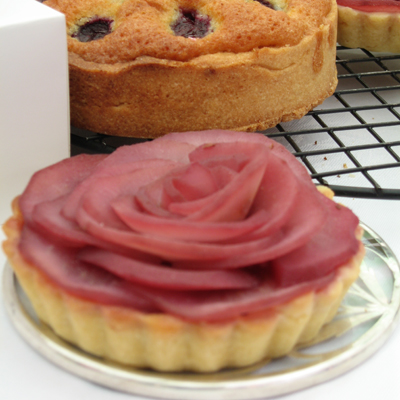
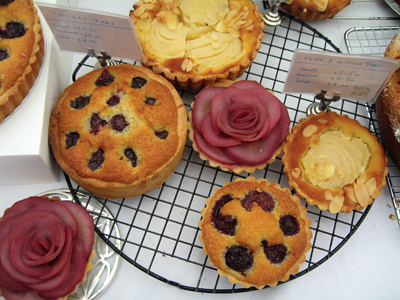 (Picture of cherry clafoutis, the wine poached pear & chocolate tart & pear tart – picture taken back in Summer 2006)
 (Cherry clafoutis, 8 inch’er – Picture taken back in Summer 2006)
