July 10th, 2007

Children’s Birthday Cake – in shape of a fish!

Coco&Me birthday cake - fish

(Last Summer I was asked by my good friends N + C to make a birthday cake for their children! I jumped at the chance as it was the perfect opportunity to make this elaborate cake I’d been wanting to try!)

Coco&Me birthday cake - fish(stencil planning how the sponge sheet should be cut)

Coco&Me

(ps: Next time, I’ll make all the letter white! Dark choc is not that visible against the colourful fruit… By the way, can you see that the letter Y’s broken? I had to make it from X & N because I didn’t have any more Y’s… And, have you noticed that the A from ALICE is a bit wierd? Yes, it’s V upside down…)

.

x .. x .. x .. x .. x .. x .. x .. x .. x .. x .. x .. x .. x .. x .. x .. x .. x .. x ..

.

For this week’s blog post, blast from the past, I’ve uploaded some piccies from almost a year ago. It’s a wopping A2 size genoise sponge cake with fresh fruit topping! I took the idea from a recipe book called ‘Green & Black’s Chocolate Recipes: Unwrapped – From the Cacao Pod to Muffins, Mousses and Moles

.

The book suggests making chocolate sponge with cocoa powder, & honeyed greek yogurt for a health-concious spread, but I decided I prefer the simplicity of a classic genoise with light chantilly cream (whipped double cream), just like the strawberry cake I loved as a child in Japan (苺のショートケーキ).

.

x .. x .. x .. x .. x .. x .. x .. x .. x .. x .. x .. x .. x .. x .. x .. x .. x .. x ..

.
From this week I’ve taken on another job title – ‘english teacher’. Yep, me. English teacher. Can you believe it? Laughable right? I’m far from perfect in English (as you can tell from my awful writing on this blog), yet, I’ll be teaching to a Japanese lady every Monday from now on (that is, until she decides to run away)! Today was the first lesson, an hour & a half long, while my boy is at nursery. Went well I think, a big relief. So handy too – making a bit of extra dough (£10 per hour) that could go toward that evening’s dinner!
.

I’ve been taking on other extra curriculum activities these days too. Last week I squeezed in baking another wedding cake, & I have promised another customer to provide serious amounts of cakes for a large scale party this August. Talking of things to do, this reminds me, I mustn’t forget that I’ve also been meaning to take process photographs of Pâte sucrée for the blog post from a couple of weeks ago

.

June 18th, 2007

Pâte sucrée (sweet pastry dough)

Coco&Me - picture from the stall

(The other week, a photographer called Gideon came by my stall to take some pictures for a picture library. What was really nice was that he has sent me the pictures, like he promised to! – So refreshing, coz I’ve had so many photographers promising to send me a print, but then never do so… – Here’s one that I especially liked!)

.

x … x … x … x … x … x … x … x … x … x … x … x … x … x … x … x …

.

This week, it’s about the tart dough I make every week.
.
Like all the recipes on my blog, it’s tried & tested – I can confidently say that it works & it’s the best. It’s actually tasty & flavourful, you can happily eat it on its own, – not like a bland tart casing that gets forked to the side of the plate with dissapointment.
.
(O.M.G, I’ve come across sooo many unappetizing tart cases in cafes & restaurants, you wonder why you’ve bothered paying your hard-earned money for such a boring tart!

.

And has anyone noticed that many of these establishments are now using ‘ready-made’ empty tartelette shells they buy in bulk from the catering wholesalers? When I was in Bond Street a couple of weeks ago, I had the time to wonder in to a reputable department store there, & as I do, I check their basement cafe, hoping for quality inspiration, & was bitterly dissapointed that the fruit tarts they had on display were using the ‘ready-made tart shells’! With a more than worthy price tag nevertheless! The cheek! £3.75 for a factory made, poorly made, puny fruit tart anyone?

.

It reminds me a bit of that chef off the telly who keeps using ready-made sponge flan bases from the supermarket in his desserts – honestly, why use inferior products with additives & god knows what else in it, & spoil the taste of the dessert you’ve been slaving on?? It really angers me when I see such products advocated. I think the guy is missing the point of “fine pastry making”…)

.

x … x … x … x … x … x … x … x … x … x … x … x … x … x … x … x …

.

Pâte Sucrée:

Pronounced “paht sou-kray”, the texture of pâte sucrée is crisp & crumbly like cookies such as shortbread. The taste is buttery rich, but not overly sweet like what the name suggests. It can be used to make sweet tarts & as a thin sheet under mousse. The left over can become delicious cookies that children would love cutting shapes from. Pâte sucrée is known as a ‘short’ dough, because of its high fat content to flour.

.

Please note, my recipe is a little different compared to the classic Pâte Sucrée recipes around, as it uses some almond powder in it. I think that’s what makes this pastry dough especially flavourful!

.

Pâte Sucrée Recipe:

(To make enough dough for a 8 inch/ 20cm tart)

Ingredients:

Unsalted butter at room temperature … 55 grams
Castor sugar … 32 grams
Eggs … 20 grams
Almond powder … 15 grams
Plain flour … 100 grams

.

  • 1. Place the room teperature butter in a deep mixing bowl (so that it doesn’t spit everywhere when you’re whisking).
  • 2. Cream the butter using a whisk or an electric mixer, beat it till it is ‘creamy’ soft, smooth & light from incorporating the air.
  • 3. Mix in the sugar.
  • 4. Add the eggs bit by bit & whisk it all in.
  • 5. Then mix in the almond powder.
  • 6. Next, in goes the flour. Using a spatula, mix it all in by pushing it against the bowl. Or do what I do, which is to wear food gloves & get in there with your hands. It’s so much quicker to do it like that when you have a large quantity like I do.
  • 7. Pat it in to one big mound, & clingfilm it tight.
  • 8. Refrigerate overnight.
  • 9. When time has come for you to roll it, first prepare a lightly floured clean surface (I use a lightly floured silpat).
  • 10. Get your chunk of chilled pastry dough in the middle.
  • 11. Lightly flour the rolling pin & roll firmly in one direction only, then turn it 90 degrees and roll again. Repeat until desired thickness. Never ‘stretch’ it by hand as this would cause the tart to shrink in the oven!
  • 12. Once the pastry circle is larger than the size of the tin, roll the sheet of pastry around your rolling pin & lift it up.
  • 13. Gently lower it on to your tin. Unroll.
  • 14. Using your fingertips, take the edge of the pastry & ease it in to the sides.
  • 15. Roll the rolling pin across the top to cut the excess pastry off.
  • 16. Put the tin in the refrigerator to rest for atleast 30 minutes before baking.

.

x … x … x … x … x … x … x … x … x … x … x … x … x … x … x … x …

.

Top Tips:

  • Do not over mix. It produces gluten & make the dough tougher.
  • Try to work quickly, minimizing the amount you’re handling it.
  • Work in a cool room. You don’t want the butter to melt in the dough.
  • I wear food gloves. Not only is it hygienic, my warm hands won’t be in contact with the dough.
  • Pick the surface with fork if you’re blind baking.
  • Be absolutely precise with the measurements. if not, you’d either end up with sticky wet dough, or a crumbly dry dough! I always use a digital scale.
  • If the dough becomes too soft while you are rolling, re-chill for a while until it’s manageable again. Adding more flour to it to make it firm is a definate no-no. It’ll unbalance the carefully considered measurements.
  • And remember, prepare in advance! You need to rest the dough in the fridge for a whole night to let the gluten relax. It’s to make the dough workable & to prevent shrinkage. And when you’ve rolled it on to a tart tin, you need to put the tins back in the fridge for 30 minutes atleast – again to prevent shrinkage.

.

x … x … x … x … x … x … x … x … x … x … x … x … x … x … x … x …

March 29th, 2007

Parisien macarons (& ganache filling)

handmade macarons made by Coco&Me - sold at Broadway Market, East London

(The paper discs make the display colourful despite it being only two types of Macarons!)

.

Macarons. Macarons. The Heavenly Macarons.

.

They are what dessert foodie’s Heaven is made out of. Delectable morsels that have a smooth domed surface, which encases a texture that can only be described as soft, gooey, slightly chewy… Mmmm… Which you’d be munching slowly… savoring every bite… with the ganache chocolate centre combining in your mouth… Mmmm… But then… will be finished before you know it! Ahh… Just imagine Homer Simpson’s drooling passion for his Donuts – that same passion applies to me about Macarons…

.

I sell pink Macarons (with raspberry jam + ganache centre) & chocolate Macarons (with dark ganache centre) at my stall. I would love to sell many different coloured ones, as one of the attractions of these morsels is the array of colours it could come in, irresistably displayed like cute buttons. But work-time-wise, I am at my limit. I already make more than ten types of cakes every week, & chocolate truffles, etc, on top of that… Pink & chocolate colours are by far the most popular at the market it seems, so I’ll stick to those colours for now!
.
So without further ado, here is the recipe(s) for Macarons.
I’d be explaining the base recipe which you’d use to create any colour Macaron you’d like. And then I’ll also list the ingredients list for Chocolate Macarons, which requires you to swap some of your almond powder with cocoa powder.
.
Warning:
… … This dessert is very difficult to master. A perfect Macaron MUST have ‘THE FOOT’ which is the raggedness around the edges. It mustn’t come out cracked. It must be round. Each Macaron must be of same size.
… … So I’m afraid it’s all about trials & tribulations! I’m yet to meet anyone who’d made it perfectly from their first go. It took me numerous attempts with recipes from many sources to get it looking alright enough for me to sell. To have to try again & again til perfection is a test of endurance for your love of Macarons. Just remember, every single step in the recipe is important, otherwise, sorry to say, you’re doomed for failure.
… … Also, please remember that everyone’s oven is different. Is it fan or convection, is it pretty old & not precise with temperature, does it have heat spots… (I have a heat spot on the right for example). Every oven has it’s own knack. So I recommend the use of an oven thermometer! This little biscuit requires preciseness.
.
Although despite these warnings, please don’t be intimidated by its complexities. Try! & besides, you’d always be able to eat them test batches for yourself, right!? (Like I do). Surely no harm done… ;-)
.
x x x x x x x x x x x x x x x x x x x x x x x x x x x x x x x x x x

.
Macarons Recipe:
Makes approximately 16 sides (but all dependent on how big you pipe it)
.
Ingredients:

  • 50g Almond powder
  • 90g Icing sugar
  • Liquid food colouring (optional)
  • (and for the meringue the following:)
  • 60g Egg whites (about 2-3 eggs worth), at room temperature
  • 30g Icing sugar
  • For the centre: jam, buttercream, or ganache (5:4 ratio of cream & chocolate. Read below for the recipe)

.
Prepare:
a. Sift almond powder & the icing sugar TWICE. It’s your chance to get rid of the not-so-fine almond powders.
b. Line baking tray with cut-to-size baking paper (or prefably a silpat if you’ve got one). Place this tray on top of another tray (Doubling up the tray delays the heat cooking the Macaron from the bottom. This insures that the outer surface is dried up first before the inside starts to lift it up. This is what makes that all important ‘foot’ & the smooth surface that is not cracked).
c. Have a piping bag ready.
.
Method:

  • 1. Whisk the egg whites with the icing sugar. Whisk until stiff peaks.
  • 2. (Optional) Add food colouring (Literally droplet at a time, as these droplets paint the whites unapetizingly vivid if you’re too generous. But also remember that the colour intensity will be slightly less once you incorporate the dry ingredints later!). Mix it in to the whites.
  • 3. Deposit the pre-sifted dry ingredients (almond powder & icing sugar) in to the white in one go.
  • 4. Use the spatula to fold it in. Once all the dry ingredients has been incorporated & dissapeared, you must check wether you’ve reached perfect consistency. Test by lifting up the dough with your spatula – HOW DOES THE DOUGH FALL? If it is not falling down in ‘GENTLE’ continuous ribbons, try mixing it a tiny bit more. The technique for mixing at this point is to “fold & press” your spatula against the side of the bowl to deflate the air out of the whites. Do this til you’ve passed this vital ‘dough fall’ test. But just remember, don’t over mix it either… (This folding process is called ‘macaronage’. This is the most tricky bit of Macaron making. I find that you can only know how much one should fold by practising again & again…)
  • 5. Spatula the mixture in to a piping bag. (tip: having the bag over something like a juice decanter like the picture below is much easier than the professional way!)
  • 6. (skip this if you’re using silpat) Scrape the left over mixture from the now empty mixing bowl & smear it under all four corners of the baking paper. It’ll act as a glue to stick the paper to the tray.
  • 7. Pipe 3-4cm rounds on to the baking paper. Make sure to leave atleast 2cm around it as it will spread later.
  • 8. Once all piped, drop the tray horizontally on to your work surface to knock some air bubbles out & to spread the dough out a bit. (If you’re doing this at night, & you’re worried you’d wake your kid upstairs (for example), layer some kitchen towels on the work surface to dumb the sound!)
  • 9. Leave it aside for 20-30 minutes. This is to dry the surface of your macarons. After the time is up, check how dry it is by gently touching the surface. Does the dough stick back? Leave it aside for another 10 minutes. Once it’s not sticky, proceed to the next step.
  • 10. Prepare your oven shelves – you’d want to place your trays on middle shelf. I’d like to cover the shelf above it with foil so that there’s no direct heat hitting my Macarons & discolouring it brown.
  • 11. Pre-heat oven to 190 degrees.
  • 12. Pop your trays in. (Make sure they are doubled up!!) Sit by your oven with your oven gloves.
  • 13. Once ‘the foot’ graciously appears (it’s usually after 4 – 5 minutes), & has reached it’s maximum height, open the oven & quickly but safely take the bottom tray away (meaning don’t double it up anymore). Place the macarons tray back in the oven.
  • 14. Change the temperature dial to 170 degrees.
  • 15. Bake it for another 5 – 7 minutes. If the colour of the surface is starting to brown, turn the oven off, keep the door shut, & bake it with the remaining confined temperature.
  • 16. Leave aside to cool together with the hot baking tray.
  • 17. Once cooled, you’d have to remove it off the baking paper. To do this, you dab water on the baking paper under each Macaron & wait a few seconds. The paper should peel off easily without giving. Just do this process slowly & patiently – these Macarons are delicate stuff (if you’re using silpat, just use a knife & slide them off). Now, you can either go to the next step, or decide to store these discs in a consealed tupperware – it’ll keep for several days.
  • 18. Pair up the Macarons.
  • 19. Pipe the ganache centre mixture (Please read the ganache recipe below) or any other mixture of your choice & sandwich the Macarons together.
  • 20. Place in a tupperware & store it in a refrigerator.
  • 21. Best eaten the next day!

.Step by step photo of the Macaron making process
x x x x x x x x x x x x x x x x x x x x x x x x x x x x x x x x x x
.
1:1 Ganache centre recipe:
.
Ingredients:
50g of fresh double cream
40g of dark chocolate
1. Have the chocolate ready in a mixing bowl.
2. Heat cream in a smallest saucepan you have. Bring it to simmering point
3. Pour the hot cream over the chocolate.4. Leave to stand for 10 seconds. Then use your spatula to mix it in – SLOWLY – from the centre, incorporating more cream from the sides as you do it.
.
x x x x x x x x x x x x x x x x x x x x x x x x x x x x x x x x x x
.
Chocolate Macaron Recipe:..Ingredients:
45g Almond powder
90g Icing sugar
5g Cocoa powder
Red liquid food colouring
(and for the meringue the following:)
60g Egg whites (about 2-3 eggs worth), at room temperature
30g Icing sugar.Method:
Please follow the basic recipe above. The red food colour will add that extra richness to the chocolate colour. To make green tea Macarons, you can user the same measurements as this – just swap cocoa to green tea powder, and omit the red colour.
.x x x x x x x x x x x x x x x x x x x x x x x x x x x x x x x x x x.
“AHHH. Donuts Macarons… What can’t they do.” – adaptation quote from Homer Simpson…!
.Update 20.06.07

ps: Which is the correct way to spell – macaron or macaroon? The original french version is ‘macaron’. But the english version seems to be ‘macaroon’… Pronounced with the ‘oo’ too. But doesn’t that point toward the American Coconut Macaroons…, not the French kind? If anybody knows, please advise me!!

March 4th, 2007

Luxury Brownies (the secret recipe)

Luxury Brownies - homemade by Coco&Me.

Dearest readers, this week I’d like to share with you my secret recipe for BROWNIES that I sell on my stall.

.

The Brownies War:

As you can imagine, brownies being so popular, there are many stalls selling them at my market (I counted ten stalls/ shops). It’s big headed of me to say this I know, but, I’m proud to say that mine always sell-out no problem. I make tonnes of it too – about 30 chunky slices per week – & on a week when I know the business will be good (ie: sunny weekends, & Christmas weekend), I make 40 – 50 slices, & they still go.
Because of this, I briefly debated wether to share this recipe online like this, but…, what the heck, I’ve got enough ‘regulars’ devoted to mine, & it’s competitively priced. Even if someone do a copycat, I’m confident that it won’t affect my sales!
.

The history of Brownies:

Obviously, the name comes from the colour of this cookie/ cake. The origins, on the otherhand, is uncertain – but folklore has it that it was created by accident by a careless cook who’d forgotten to add baking powder to the chocolate cake. (Many origins of cakes are invented by careless cooks! Tarte Tatin was also created similarly.)

The first brownie recipe was published by Fannie Merrit Farmer in 1896, which calls for a nut tobe embedded in the centre. All early brownies contained chopped nuts too.

.

x . x . x . x . x . x . x . x . x . x . x . x . x . x . x . x . x . x . x

.
LUXURY BROWNIES RECIPE

.

These brownies are ‘seriously’ the BEST. I can assure you. Wanna know why? Because it’s got plenty of delicious nuts (pistachio, walnuts, hazelnuts, pecans) in them, & it is double chocolatey, as it uses both cocoa & solid chocolates in the recipe – which is unusual, when most recipes call for just ‘either or’.

.
Texture: moist, dense & fudgy.
Difficulty: easy as pie.

.
Ingredients:
230g Butter, roughly cubed
310g Sugar
(Granulated or Castor)
200g Whole eggs (approximately four) whisked up
230g DARK Chocolate
– in small pellet form or chopped finely so it melts quickly (very important)
140g Flour
40g Cocoa Powder

200g of nuts of your choice (pistachio, walnuts, hazelnuts, pecans – You can use just one type or use all four types like I do. They add different crunchy textures to every fudgy bite, which makes the brownie interesting til the last bite)

20cm square baking tin
.

Prepare:

a. Butter the baking tin. Then line the bottom & the sides with baking paper.

b. Sift together the flour & the cocoa powder.

c. Have the chocolates ready in a large mixing bowl.

d. Leave aside some nuts to decorate the surface of the brownies with (in my opinion, walnuts look best).

e. Preheat oven to 180 degrees.

.

Method:

1. Melt the butter completely in a large pot.
2. Add the sugar. Dissolve.
3. In a separate mixing bowl mix the solid chocolates & eggs (make sure to mix well).

4. Pour the piping hot mixture (from 2) over the chocolates/eggs in a bowl. Mix quickly & thoroughly – make sure all the chocolates have dissolved (if you still have lumps of chocolates left, zap it at 10 second intervals in the microwave until it melts).

5. Spatula in the flour & the cocoa powder. Mix until no traces of flour can be seen.
6. Mix in the nuts. (Make sure you leave some aside for decorating the top with).
7. Pour the mixture in to the prepared tin.
8. Evenly decorate some more nuts on the top surface.
(Make sure each slice would have a decorative nut)
9. Bake in the oven (that has been pre-heated to 180 degrees) for 18 to 22 minutes. It’s cooked when the edges have gone slightly dry, the top is shiny & has cracked. The centre of the brownie shoudn’t be wobbly when shook. Remember: the toothpick method won’t work on this fudgy brownie!
10. Leave aside to cool. Don’t cut until they’ve reached room temperature, or even better leave it untouched for a WHOLE DAY to rest – I can promise you, it’ll taste better tenfold.

.

Brownies recipe explained in image sequence.

Note:

This recipe is versatile – instead of nuts, you can put pretty much anything in there – like dried fruit such as dried cherries, or fresh fruits like raspberry. Baking is meant to be fun & so don’t go out-of-your-way to buy the nuts if you haven’t got it (as nuts can be expensive). Use whatever that is in your store cupboard & experiment! like, be creative with sliced almonds & spell a letter on the surface!

.

x . x . x . x . x . x . x . x . x . x . x . x . x . x . x . x . x . x . x

October 21st, 2006

Tarte Tatin

tart_tatin

Hello! Well here it is, my first blog entry. I have been wanting to do a blog for sometime now, so right now I am slightly giddy with happiness. I have been running my chocolates & cakes stall for exactly a year. So much has happened within just this one year, so many interesting people I met, so much knowledge I gained. I hope to write down those types of things in this online diary.

For the readers who don’t know me, a little introduction: I am a market stall trader at Broadway Market. I am there pretty much every Saturday 9am til 4pm or until whenever I finish selling off all my items! (Come visit me!) Broadway Market is an outdoor street market with a good vibe, very London, with about 60 stalls mostly selling tasty food, & some excellent stalls selling clothing/ bags/ objects/ all sorts. I think it is the best market around in London (ofcourse I’d say that!).

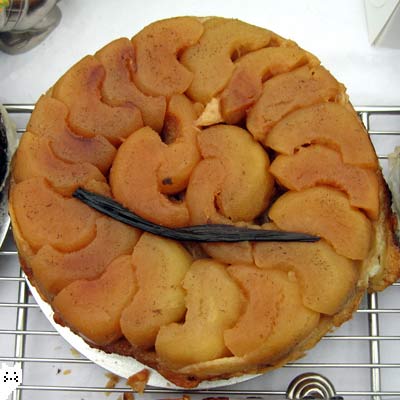
Tarte Tatin is currently my favourite tart that I have on my stall & it feels right to be the first to feature.

It is an up-side down carameralized apple tart. Wonderfully rustic, classic French tart. It is cooked for about an hour & the apples are so soft (softer than ice cream) & squishy it just melts on your mouth.

There are several versions to the history of Tarte Tatin. The one I like is this: Stéphanie Tatin, one of the two Tatin sisters from the small rural town in the Loire Valley in France, overworked & a bit ditzy, baked an apple pie up-side down by mistake but served it at their hotel anyway! I love that there is a story behind it. I also like the way the French people apparently named it ‘tarte des demoiselles Tatin‘ (the tart of two unmarried women named Tatin).

It is made with just four or five simple ingredients; apples (approximately a whopping two kilograms of!), sugar, butter, puff pastry, & an optional vanilla pod. It is simple enough to make too – just caramelize the sugar & butter, align the halved apples & cook on the hob for a while. Then place puff pastry sheet over it & bake in the oven! When cooled, flip over & hey presto, you’ve got a Tarte Tatin!

Apparently this tart can easily be made with other types of fruit – pears, peaches, prunes, quince… any fruit experimentation valid. Which makes me think maybe I should try a mixed fruit version like a four-seasons pizza! That sounds fun & could look colourful, no?

I was in a minor dilemma about wether I should share my stall recipes online, customers might stop buying my stuff & start making it themselves! But I realize that, afterall, most of the recipes I use are not exactly my own anyway, it’s a mishmash from all sorts of sources, or slightly adapted. So how can I hog it to myself? Besides, if someone trusts my recipes as much as wanting to try it themself, then it is an honour.

Tarte Tatin Recipe:

You will need the following sorted & measured before starting…, & always read the whole recipe first so that there are no surprises while baking.


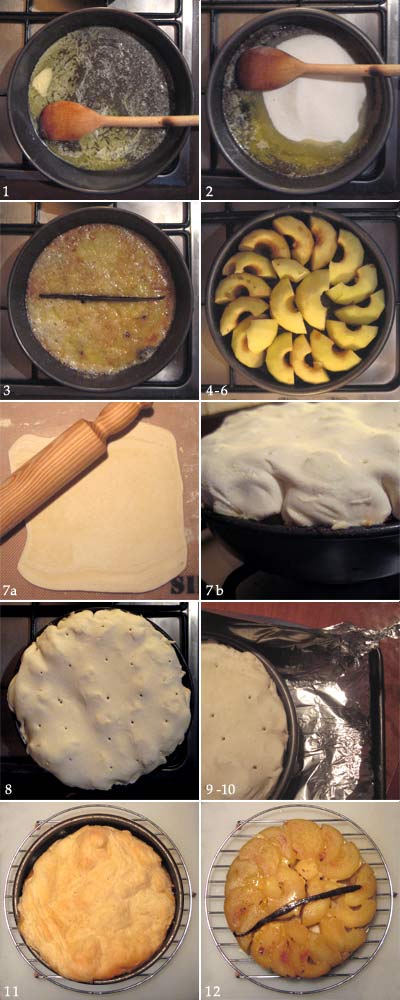
  • 20cm diameter solid pan (a pan that is not loose-bottomed)
  • 80g of butter, roughly cubed
  • 160g of sugar (granulated or castor)
  • Approximately 2kg of apples, peeled, cored & halved (it’s worth experimenting with different varieties. From my experience Braeburn is better & less mushier than Cox. I’m yet to try Granny Smith)
  • 250g of puff pastry (store bought does a fine job. Wouldn’t bother making it from scratch, too much hard work! Note: Supermarkets sell in 500g, so its best to clingfilm the rest & freeze it until next time)
  • 1 vanilla pod, split lengthways & de-seeded (the best way to do this is to first use the back of the knife, press & run it down the pod & then cut. This way the pod is flat & easier to cut)
  • Roasting tray that will fit the pan
  • Foil


1. Melt the butter in the pan over the hob.
2. Soon as it has melted, put the sugar & the vanilla seeds in. Let the sugar dissolve.
3. Place the de-seeded vanilla pod skin in the middle of the pan.

4. Tightly align the prepared apples, first from the outside (don’t worry, there should be plenty of apples left to stuff in to the gaps at a later stage).
5. Cook on medium-high heat. The liquid should start to look carameralized & brown. Plenty of juice from the apples are now coming out & mixing with the caramel & is bubbling away. Here, be careful with your heat-control & adjust so that the juices don’t spill out. If the pan you are using has low sides, the sticky juice will spill out & make a right old mess on your cooker. (which, if it does, then it is best to wipe clean soon as you are finished – don’t wait til it hardens. It’s a back-killer to clean)
6. After a while, you’ll notice that there are spaces to shove more apples in. Now is the time to place as much apples as you can (but don’t be tempted to cut your halves in to smaller slices to fill it – it will make the final tart look like one big mass of squashed guu. You want rustic, thrown together look, & the apple shapes still intact). Now switch the hob off. Start to pre-heat the oven to 180 degrees centigrade.
7. Roll out the puff pastry so that the sheet is bigger than the pan. It does not need to be a neat circle. Place on top of the apples. Use your fork (in my case a cooking chopstick) & tuck in the ends inbetween the apple & the pan sides. Note that this tucking-in bit is very important – because if you don’t tuck, the pastry will shrink when baked & be smaller than the pan, & will not be big enough base for the apples once the tart is flipped over.

8. Pierce some breathing holes on your pastry so that hot air can escape.

9. Get any high-sided tray, like a roasting tray & line it with foil. Place the pan in it (the roasting tray is a must-have to collect the pool of more sticky caramel liquid that oozes out while the tart is in the oven – otherwise you’ll have the oven to scrub).
10. Pop it in to the pre-heated oven for 40 minutes.

11. Once done, cool it in the room as is. Once cooled, place on the top shelf of your refrierator (top-shelf because health & safety-wise any food that is to be eaten as is should be on a shelf above anything that is raw like meat, so that there is no risk of raw meat juice leaking on to your tarte). Preferably leave it there for half a day to set the shape.
12. When ready to serve, first, look at the pastry. Is it stuck to the sides of the pan? Use clean fingers to nudge it free. Now get your cake stand. Place the cake stand upside down on to your pan. Using slow & good maneuvering skills, tightly hold both stand & pan together, & flip it over. Drum-rolls. Slowly remove the pan mold. Hey presto! There should be a wonderfully formed tart in front of your eyes!

.

How to make Tarte Tatin in pictures

So anyway, I hope this first ever entry goes down well & thank you for enduring my bad writing… Please leave comments if you like to. – I’m so tempted to write more but, I now plan to have dinner with my family, & then once my kid goes up the wooden steps to bedforshire (as D likes to say!) I plan to watch the Da Vinci Code DVD we bought from Tesco with everyone, merry with a bit of sake. I know I’d probably fall asleep on the sofa half way through…

I’m thinking of uploading an entry at a once-a-week rate, so please come back around the same time next week!
t xx

  Next Entries »