February 1st, 2008

Children’s birthday cake ~ banana cake trains!

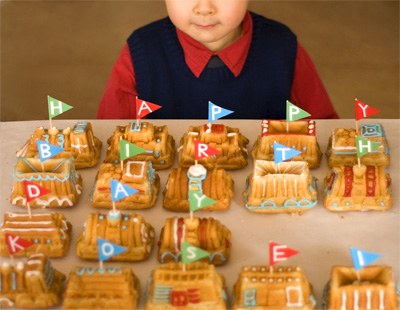
I baked this set of trains for my kid’s best friend’s 4th birthday!

I kept the icing simple with just three colours & as minimal as I can allow it. I stayed away from using sugary gum drops & other store-bought sweets because: One, as a parent I wouldn’t want my 4 year old introduced to those things yet, & Two, icing them is so much cheaper! :)

Coco&Me - Children's Birthday Cake - in shape of Trains, with royal icing!

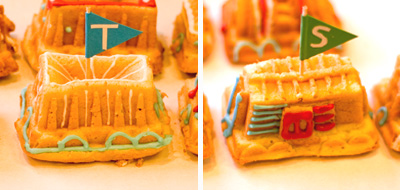
Handmade paper flags glued to cocktail sticks:

I decided it’s better if the flags were not white. It will be lost in the background, & the coloured flags would add the much needed extra colourfulness that my minimal-icing-ideology doesn’t provide. – But on the other hand, I made more work for myself & D (he helped), as I couldn’t just ‘stamp’ letters on to dark coloured paper (I don’t have white ink), & had to cut each letter out & glue them!

Each child received one train each. It was easily distributed since there was no cutting slices involved. The flags were popular (“I’ve got K!” & so on). Everyone took it home with them!

(At every children’s birthday party we go to, there’ll always be another kid who’d be blowing the candles too! :)
Coco&Me - Children's Birthday Cake - in shape of Trains, with royal icing!

(For the cake board base: I cut cardboard to size & covered it with white baking paper.)

Coco&Me - Children's Birthday Cake - Trains - with Banana Cake Recipe! - NORDICWARE

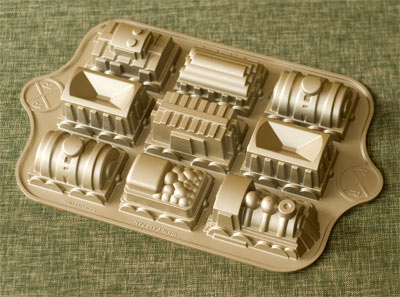
(Nordicware Train Cake Pan purchased from Lakeland)

.
Am I turning in to a right old woman or what?

Because when D spotted the Nordicware Train Cake Pan in the shop, I was soooo happy – like, deliriously, over the moon style! It’s really difficult to find Nordicware here in the UK, & this particular train cake pan had been on my wish-list for over a year. I once spent a whole night trawling the internet to see if anyone sells this in this country but to no avail…

BUT…! Out-of-the-blue, there it was in front of my eyes… SO, readers, hopefully you can understand my cake-fanaticism, & picture me enthusiastically charging my way to the cash-till in nano-second-flat, flared nostrils, seeing nothing but red until I successfully purchased it, until “It-Is-Mine!” (followed by manic laughter – Dr Evil style…)
.

x x x x x x x x x x x x x x x x x x x x x x x x x x x x x x x x x x x

.

This purchase came at the perfect timing too, as the following week I was to make a birthday cake for my son’s best friend. Like always, I test-baked several days before the real bake-day, to remove any uncertainties that could potentially ruin the result. The lessons learnt from the test-bake was valuable:

  • The cake batter must be piped (not dolloped in), so that the batter reaches all intricate detail of this cake pan.
  • Batter must be pasted/ pushed to all the sides with a spatula to avoid ugly air-holes appearing on the train surfaces.
  • Batter must be to the fullest brim to perfectly imprint the cake design.
  • Must use more colours than just white for the icing, unless it’s a snowy scene you’re trying to create.
  • It is best to pipe extra details like ‘grills’ & ‘windows’ or even abstract polka-dots, rather than faithfully outlining/ following the grooves of the cake.
  • Mustn’t pipe too much icing on it because the cake would become too sweet – & I can imagine the parents getting worried about too much sugar consumption! (especially if it’s artificially coloured!)

.

After consideration, I decided it should be a banana cake. A boring sponge won’t do (it’ll taste too normal unless there’s a delicious filling layer), nor it shouldn’t be chocolate coloured (the imprinted design wouldn’t be as visible). D suggested ‘marbled cake’ but that’ll just be ‘too busy’ with the intricate designs. – But a banana cake on the other-hand I thought, is gorgeously moist, popular with everyone & should get a nod of approval from the parents as it sounds natural & it uses less refined sugar.

.

So here is the recipe for my banana cake. It is a ‘Pâte à biscuit’ sponge method. (whereby the egg is separated – yolk goes in with the sugar, & the whites are whisked to a meringue, before being combined.)
I also added the recipe for the royal icing at the end.

Both recipes are easy-peasy to make!

.

x x x x x x x x x x x x x x x x x x x x x x x x x x x x x x x x x x x

.

MOIST BANANA CAKE RECIPE:

.

Ingredients:

(quantities to fill the Nordicware train pan)

200g Ripe bananas
100g Sugar
5 x Egg yolk
5 x Egg whites
100g Sugar (to whisk in to the whites)
150g Plain flour
75g Almond powder
75g Butter
.

Prepare in advance the following:

  • Butter the mould (here, it is best to use a pastry brush & slightly melted butter to really get to every intricate details & grooves). And finely flour the mould by sifting it.
  • Melt 75g of butter. Set aside until needed.
  • Pre-sift the plain flour & the almond powder.
  • Pre-heat oven to 180 degrees.

.

Method:

  • 1. Slice the 200g of ripe bananas, place them in a mixing bowl & use the electric whisk to purée it.
  • 2. Add the 100g of sugar & whisk it together.
  • 3. Combine the 5 x egg yolks. Then set aside.
  • 4. In another bowl, whisk the 5 x egg whites to a stiff meringue with 100g of sugar.
  • 5. Combine 1/4 of the meringue in to your egg-mixture from step 3.
  • 6. Sift all the dry ingredients (flour & almond powder) in. Combine with spatula.
  • 7. Pour in the 75g of melted butter & combine with spatula.
  • 8. Fold in the rest of the meringue.
  • 9. Put the batter in to a disposable piping bag.
  • 10. Snip the end so that you get a 3mm opening, & start to pipe it in to the intricate details.
  • 11. Then snip a wider opening (say about 1cm), & pipe the rest in.
  • 12. Place in the pre-heated oven of 180 degrees, for approximately 18 minutes. – When time is up, check if it is done by skewering the middle of the cake. If the skewer comes out clean & is warm to the touch, it is done.
  • 13. Take it out of the oven. Place a cake-cooling-rack on top. Grip both cake pan & rack, then reverse it so that the train-mould is on top. Take the cake pan off. The cakes should come out easily. (It is best to cool it right side up, to flatten the bottom of the cakes.)
  • 14. Once the cake has cooled, proceed to make the royal icing.

.

x x x x x x x x x x x x x x x x x x x x x x x x x x x x x x x x x x x

.
ROYAL ICING RECIPE:

.

Ingredients:

1 x egg white

125 to 150g of icing sugar

Food colouring

.

Method:

  • 1. Whisk the egg white with a table spoon (not with electric mixer as it’ll become ‘too’ foamy) for about 5 minutes.
  • 2. Mix 125g of icing sugar in to the whisked egg whites. This will give you the basic white icing. Experiment with the fluidity depending on wether you want to cover a large surface or wether you would like it to pipe patterns. If you want it to be thicker for piping patterns, gradually mix in more icing sugar. (In my case, I used 150g of sugar in the end, but it’s best to be your own judge here.)
  • 3. If you would like it coloured, add food colouring drop-at-a-time.
  • 4. Put the icing in a piping bag, snip the end off (say 2mm for pattern piping) & pipe away!

.

Tip:

If you want several colours to work with, just divide your white icing at step 2 in to however-many-bowls, & then colour each bowl differently.

If the royal icing becomes hard while you’re working, add a few droplets of water to loosen it.

If artificial food colouring worries you, try to find ‘natural’ food colouring in the shops, or you can alternatively try: matcha powder for green, & cocoa powder or instant coffee for brown. (If you know of any other ways to colour naturally, please please let me know!)

.

Happy Baking!

x x x x x x x x x x x x x x x x x x x x x x x x x x x x x x x x x x x

January 17th, 2008

The ultimate crème caramel ~ creamiest & delicately soft ~

Coco&Me - The Ultimate Crème Caramel Recipe (with photographs of the process)(It’s the most creamiest, & yet most delicate Crème Caramel I’ve ever tasted in my life!)

Coco&Me - The Ultimate Crème Caramel Recipe
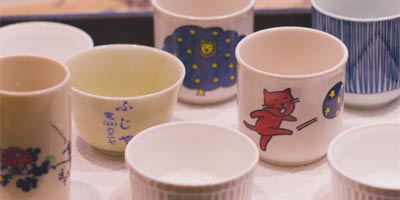
(I didn’t have molds that were all the same, so I used my collection of Japanese tea cups instead! – The two illustrated ones are from my childhood. And the one with the writing is a soba (buckwheat noodle) sauce dish that my parents brought over from Japan over 25 years ago!)
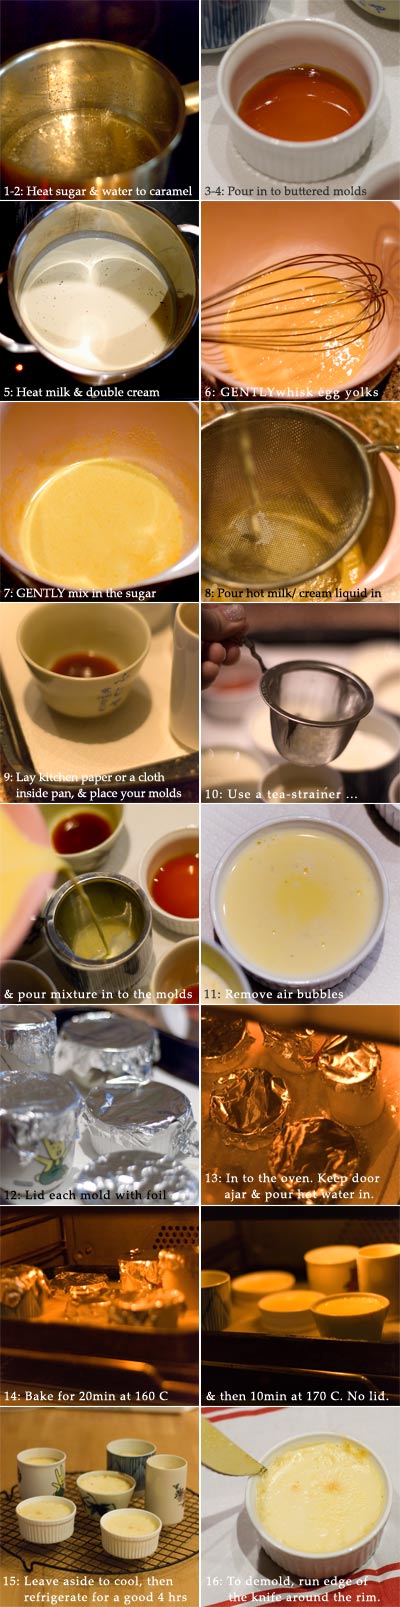
.

x x x x x x x x x x x x x x x x x x x x x x x x x x x x x x

.
Since my last post:

I’ve been naughty of late. My sweet tooth never stops craving, it’s just terrible. My nearby convenience store’s got a “buy two tubs for a fiver” deal for big tubs of Häagen-Dazs (Praline & Cookie’s n’ Cream’s my favourite – what’s yours?). And I’ve been tucking in to them with a big tablespoon (no dilly-dallying with a wee teaspoon I say!), late at night, wrapped up in my blanket, fireplace on, surfing the web endlessly with the other hand, quite meaninglessly whiling away my time, browsing from a web link to another link…

.

But, now that the cheap ice cream deal is over…, I decided I must start making my own desserts again that I can stick my sweet tooth in to!

.

x x x x x x x x x x x x x x x x x x x x x x x x x x x x x x

.

So, here is the ULTIMATE recipe for Crème Caramel that I have been indulging in lately.
.

I call it ‘Ultimate’ because, I can honestly say it really is the most creamiest, & yet most delicate Crème Caramel I’ve ever tasted in my life! Every luscious spoon sends blissful melt-down of your surroundings, & before you know it, it’s gone… – & you curse yourself for not making more… Yup, ladies & gents, it’s THAT good.
.

It is dead-easy to make too if you follow certain steps. Crème Caramel in basic terms is literally just a three-step method: mix, sieve & water bath, with the most simplest of ingredients (eggs, sugar, milk & cream optional). The most important trick to keep in mind is to try NOT TO incorporate AIR, as the final silky texture will suffer greatly.
.

In this special recipe, I did not use any egg-whites, as per normal Crème Caramel recipes. It relies on just egg-yolks to set the liquids. This is what makes this that extra rich & thick in flavour, yet delicate, as well as the softest you’ll ever ever taste. Despite no egg-whites, it keeps its shape very well, so long as you refrigerate it for a good 4 hours.
(Note: Although, if you’re using a very big mold, it maybe better to look for a recipe that uses whole eggs &/or gelatine that will help to hold its shape better.)

.

Please keep in mind the quantity of ingredients listed below makes roughly 6 to 8 individual Crème Caramels. It’s all dependent on the size of your chosen molds. The best way to know how many this quantity will make is to measure 700ml of water & fill the molds to see how many it fills.

.
x x x x x x x x x x x x x x x x x x x x x x x x x x x x x x

.

THE ULTIMATE CREME CARAMEL RECIPE

.
Ingredients
For Caramel:

40 cc Water
80g Sugar
20cc Water

For the Crème:

250cc Double cream
250cc Milk
4 x Egg yolks
60g Sugar (granulated or castor)
A few drops of Vanilla essence OR half a vanilla pod, split length way

.
Prepare this before you begin:

  • Make sure your eggs are at room temperature, as cold egg won’t mix well with the milk.
  • Butter inside the individual molds so that the Creme Caramel de-molds smoothly.
  • Pre-heat the oven to 160 degrees.

.
METHOD:
.
First make the caramel.

  • 1. First stir the sugar & 40cc of water to a syrup in a small thick bottomed pan. Then cook on medium heat so that the whole base of the pan is equally heated. During this time do not stir too much.
  • 2. Once it starts to colour, stir with a wooden spoon. The colour will start to darken – & once you reach ‘a step or two before’ your desired darkness, take it off the heat & SLOWLY pour & stir in the 20cc of water to stop it colouring any further.
  • 3. Immediately pour the caramel in to your molds before it becomes too thick to handle.
  • 4. Make sure the bottom is completely covered by tilting the mold around.

Caramel Tip:
– Never let the caramel darken too much, it’ll taste too bitter. The caramel suddenly turns
from sugar liquid to dark & bitter in a split second, so I advise you take it off the heat (in step 2) while it is slightly lighter still. It’ll darken ultra-quickly while you’re stirring more water in to it anyway.
– Never leave it cooking alone. It is dangerously hot.
– Never ever pour the water in to it in one go. It is highly dangerous as it will foam up like mad & increase in volume & splutter.

.

Next, make the Crème:

  • 5. Heat the milk & the double cream in a pan – (with half a vanilla pod if you’re using it instead of vanilla essence).

Tip: Here, never let it reach the boil. Or more precisely, never let it go over 60 degrees as the milk will form a skin on the surface. – At 60 degrees the protein coagulates when exposed to air. So skimming & throwing away this skin means you are throwing away the delicious proteins & fat molecules.

.

  • 6. While the milk mixture is heating, GENTLY whisk the egg yolks in a mixing bowl.
  • 7. Then mix in the sugar GENTLY.

Tip:
– Always mix the sugar into the eggs straight away. Don’t leave the sugar lying around with the egg as the sugar will absorb moisture from your egg & leave dry gravelly bits.
– Always stir the sugar in SLOWLY. Do it as if you’re cutting it up, rather than whisking it, as if you’re scraping the sugar against the bowl. Crème Caramel is a dish that purely uses the solidifying power of the egg as it heats, so the finer you ‘cut’ the egg yolk up, & incorporate it in to the mixture, the better the overall texture.
– DO NOT INCORPORATE AIR whilst mixing. This is the most vital trick to make your final Creme Caramel smooth.

.

  • 8. Pour & mix the hot milk/ cream liquid in to your egg bowl. Add vanilla essence if you are using it instead of vanilla pod.

Tip: Pour in a small amount first & mix, & then pour some more. Let the egg mixture get used to the hot liquid little by little. Never pour the hot liquid in to it in one go. You have to be cautious as eggs solidify at 60-70 degrees, although the sugar should act as a good blanket.

.

  • 9. Lay a few layers of kitchen paper or a cloth inside a roasting pan, & place your molds.
  • 10. Use a sieve & slowly pour the mixture in to the molds.
  • 11. Remove air bubbles by tapping mold lightly on your work-table, &/ or by spoon. Lightly dabbing the bubble with kitchen towel also works well.
  • 12. Lid each mold tightly with aluminium foil.

Tip:
– Laying some kitchen paper stops directly heating your Crème Caramel from the bottom.
– The temperature of the Crème mixture should still be warm (if it is cold, it’ll take longer to bake in the oven).
– Sieving the Crème mixture gets rid of air bubbles, aswell as the chalaza (the ropey strands of egg white).
– Lidding the molds with foil prevents the top surface from drying under direct oven heat.

.

  • 13. Boil lots of water in the kettle. And pop the roasting pan with the prepared molds in to the pre-heated oven. Keep the door ajar to pour the hot water in the pan, half to two-thirds up.

Tip: It’s best to pour the hot water in to your water-bath when the pan is already on the oven shelf. This way, it is less likely for the water to accidentally make way in to your molds while transfering from work-table to oven.

.

  • 14. Bake for 20 minutes at 160 degrees, & then 10 minutes at 170 degrees without the lid. After the baking time, remove from the oven. Check if baked thoroughly by gently shaking it sideways. If it wobbles too much & creases form in the middle, put it back in the oven for another 3 minutes & check again (crease form when the sides are cooked, but not the middle). ‘Bouncy’ & ‘springy’ wobble is cooked.
  • 15. Take it out of the water bath, & leave aside to cool. Once cool, refrigerate for a good 4 hours before serving so that it sets fully.
  • 16. To demold, run the edge of the knife around the rim. Place inverted plate on it. Hold both mold & plate firmly together, then flip it so that the mold is on top. Gently shake up & down. It should smoothly come out. Let the caramel sauce pool around the set Crème.
  • Bon Appétit!

.
Coco&Me - The Ultimate Crème Caramel Recipe - with photos of process
.
Suggestions on alternative flavours:
You can ‘flavour’ the milk at step 5 with ‘coffee’ & ‘tea’.
You can also use honey instead of sugar too.
Or why not add brandy or rum? Or what about green tea, or chocolate flavour?

.

November 12th, 2007

Gâteau Basque with crème patissière

Coco&Me - Gâteau Basque(Picture taken at the stall table. – The patterned background?? I recently started to use woven wooden placemats bought from Ikea & baking paper on top to display my cakes, instead of cake cooling racks!)

Coco&Me - Gâteau Basque

(Gâteau Basque is a shallow cake with yummy custard cream centre (or sometimes cherry jam filling)! I put dried prunes in there too.)

Coco&Me - Gâteau Basque

.

Here’s another cake recipe from my stall table. It’s called Gâteau Basque, & yup, as you’ve guessed, its origins are from Basque Country, a cultural region in the western Pyrenees mountains that spans the border between France & Spain. .
.
Gâteau Basque dates from the 17th century, & its precise origins are found in the small spa town of Cambo-les-Bains, where they hold annual Gâteau Basque festival in September. Upon researching on this, I came across the existence of the Gâteau Basque Museum in the town of Sare (that is officially recognised as ‘most beautiful villages of France’) where I very much want to go to one day! (hint hint, D?)
.
There’s two ways of filling the middle layer:
One is to use the renowned black cherry jam (confiture de cerise noire), from the nearby town of Itxassou (where the cherry festival takes place in June). Or another, which is to thickly slab Crème patissière/ pastry cream (Click here to read my recipe!).
.
I fill mine with Crème patissière, & neatly lay dried prunes. Mainly because I love Crème patissière over jam, & I think the intensely condensed flavour of the dried prunes act as a welcome accent when munched with Crème patissière & the buttery biscuit-y cake.
.
Like I say, I make this for the market, & the reception I get is always very good. Most of the time, people don’t know of the cake, but on mention of custard cream middle, the British public (who grew up on custard at school & at homes) identify with the flavour involved, & make a nano-second decision to give it a try.

– There’s these two ladies who buy a slice of Gâteau Basque from me almost every week. If I didn’t have it at the table, because I was feeling slack (!) or wanting to concentrate the time on another product instead, they have been disappointed in the past. I often picture them in my mind when I’m rolling out the dough, wondering whether they be there that week.
.
Tips on making this cake:
It’s not a quick cake to make. The actual dough is a doddle, since it all happens in one mixing bowl, & there’s no sense of urgency as it’s not like there’s meringues deflating away because you’re working slow.

But it does need to rest for 2 hours minimum. (I make mine Thursday night, & roll it out on Friday.) You’d then need to make the crème pat, assemble, & finally into the oven for a whole hour! Not to forget the time it takes to cool the cake down before demolding it out of the tin!
.
x x x x x x x x x x x x x x x x x x x x x
.
Gâteau Basque recipe:
(to make a 10 inch cake. You’d be able to get 8 – 10 substantial slices out of it)
.
Ingredients for the dough:
200g butter
200g sugar
65g whole eggs
30g egg yolks
20ml rum
1g baking powder
335g plain flour (sifted)
approximately 100g of dried prunes
.
Ingredients for the Crème patissière (to make 325g):
250ml fresh milk (full fat)
vanilla pod
3 egg yolks (free-range or organic)
75g sugar (castor or granulated)
25g plain flour (sifted)
.
Ingredients for the Coffee Dorure (egg wash):
1 whole egg
1 egg yolk
half teaspoon of coffee granule
.
x x x x x x x x x x x x x x x x x x x x x
.
The method:

  • 1. Place the room temperature butter in a deep mixing bowl (so that it doesn’t spit everywhere when you’re whisking).
  • 2. Cream the butter using a whisk or an electric mixer, beat it till it is ‘creamy’ soft, smooth & light from incorporating the air.
  • 3. Mix in the sugar. Whisk until the sugar has dissolved in the mixture.
  • 4. Add the eggs & egg yolks in stages (so that the mixture doesn’t ‘seperate’).
  • 5. Pour the rum in & mix it all up.
  • 6. Sift in the baking powder & the plain flour.
  • 7. Use your spatula & mix it all in.
  • 8. When mixed, make one big ball of it & cling-film it air-tight.
  • 9. Refrigerate the dough for at-least two hours minimum, so that the dough has it’s ‘rest’ to let the gluten relax, it would become easier to roll it out later.

– – – – – – – – – – – – – – – – – – – – –

– – – – – – – – – – – – – – – – – – – – –

  • 11. Assembly time!! Get the dough out of the fridge, take roughly 2/3 of it & roll it in to a rough circular shape. You’re going to line the bottom & the sides with it. So make sure your circle is bigger than the tin base, plus not forgetting to include the width for the sides all around too.
  • 12. Butter & flour the mold.
  • 13. Lift the sheet of dough from step (11) using your rolling pin, & lower it in to the mold. Make sure you thumb it in to the corners.
  • 14. Neatly spatula in the Crème patissière layer inside. (Some pastry chefs would use piping bags for this procedure to be super neat!) Make sure the top is level.
  • 15. Flatten the prunes using the side of your knife & cut them in half.
  • 16. Neatly space them out on top of the Crème.
  • 17. Take the rest of the dough you have left over. You are now going to make the ‘lid’. Roll a circular disc that is just bigger than your mold. Using the rolling pin, lift the circular sheet of dough, & carefully lay it on top of the Crème.
  • 18. Using your thumb, push the edges of the ‘lid’ all around to seal it to the sides.
  • 19. Use knife & cut away the ‘overhang’, so that the top surface is flat.

– – – – – – – – – – – – – – – – – – – – –

  • 20. Make the coffee dorure (egg wash). Put all coffee dorure ingredients in a small bowl & mix until the coffee granules have melted, & has given lovely dark colour to the liquid.

– – – – – – – – – – – – – – – – – – – – –

  • 21. PRE-HEAT THE OVEN TO 180 DEGREES.

– – – – – – – – – – – – – – – – – – – – –

  • 22. Apply a thin layer of coffee dorure to the gâteau surface. Use a brush or your hand.
  • 23. Using the other end of the spoon (or any other instrument of your choice), draw any pattern you like.My tip here is to keep the design fairly simple. I like my pattern to be symmetrical, so that each slice you cut look pretty much the same.
  • 24. Poke a small hole in the middle as a air vent, to avoid the Gâteau Basque from forming cracks on the surface.
  • 25. Pop it in the oven for 1 hour. Do check how it is browning on top now & again. If you think it is browning too much, make a loose lid with aluminium foil to deflect direct heat to the top surface.
  • 26. When time is up, take off the foil if you were using one, & leave it aside in the mold until cool.
  • 27. De-mold by carefully inverting.
  • 28. Eat within the next 2 days. Bon Appétit!

.

x x x x x x x x x x x x x x x x x x x x x

(ps: I plan to photograph each step & put it up on this blog in the near future… promise!!!)

October 27th, 2007

Crème patissière (pastry cream)

.

I’m pretty certain you’ve all come across Crème patissière before. Pronounced “Krehm pah-tee-see-ehr”, it is also known as pastry cream, & confectioners’ custard. It’s that flour-based custard cream that’s used to fill desserts such as eclairs, tarts, & mille-feuille.

.

It is the basic of crèmes, & is the most widely used cream type when it comes to pastry making as it is used as a base foundation to make other types of creams such as Crème diplomate, Crème mousseline, Crème chiboust & Crème frangipane.

.

I make between 650g to just over 1kg of Crème patissière every week to fill the inside layer of ‘Gateaux Basque with prunes’, & also to mix some with Crème d’amandes (almond cream) to end up with Crème frangipane, which, once baked in the tart case becomes the foundation for my fresh fruit tarts.

.

So here’s the recipe below. Sorry if the recipe reads long – I tried to explain why every step is done in that way, … because, knowing the ‘whys’ of how things work, is one step closer to getting a good result!
.

x x x x x x x x x x x x x x x x x x x x x x x x x x x

.

Crème patissière (pastry cream) recipe:
.

Ingredients (to make 650g):

500ml fresh milk (full fat)
1 x vanilla pod
6 egg yolks (free-range or organic)
150g sugar (castor or granulated)
50g plain flour (sifted)

.

… ice cubes
… cling-filmed tray/ vat (cling-film the bottom & the sides with one sheet). Keep it cool in the fridge until needed.

OR

… stainless steel mixing bowl
.

  • 1. In a large mixing bowl, whisk the egg yolk. (Refer to paragraph at the end about what to do with the left-over egg whites)
  • 2. Add the sugar in one go. Whisk straight-away & thoroughly until the sugar dissolves. The golden rule here is to never leave a mound of sugar lying around in the egg yolk. Sugar has the same tendency as salt, it absorbs moisture, so if you don’t whisk it together at first instance, it’ll suck moisture from the yolk. Bits of yolk would dry, & leave orange ‘granules’ in your crème.
  • 3. Sift the flour in, & fold it in until the flour just disappears. Never over-mix the flour, as it will produce gluten, which will give your crème a tough texture. (If you want to read more about flour & gluten, click here.) – – – – – – – – Here, flour also acts as a heat-shield to protect your eggs from cooking like omelette when you add the hot milk later on. – – – – – – – – Some Crème patissière recipes call for cornstarch instead of flour, or sometimes ask you to use both. It produces slight difference. Cornstarch gives you a ‘clearer’ crème, whilst flour results in a more ‘milky’ look. The texture is also slightly different too – cornstarch one is a little ‘jelly-like’ & ‘bouncy-er’. If you are using your Crème patissière as a base to create other crèmes, then it is best to stick to just flour.
  • 4. Flatten the vanilla pod with the side of your knife (so that it is easier to cut), & cut it in half, lengthways. De-seed. The use of vanilla in Crème patissière is important as it keeps the ‘eggy’ smell down. If you are using vanilla essence instead of pod, add the essence right at the end, after the Crème patissière has cooled down.
  • 5. Place the seeds & the pod-skin in the cold milk. … Boiling milk with the vanilla is the best way to enhance the vanilla flavour to its fullest.
  • 6. Heat the milk in a pan over the hob (the size of the pan must be big enough to be used to cook the crème at a later stage).
  • 7. Let it reach just before the boiling stage.
  • 8. Pour small amount of the hot milk (roughly 1/4) in to the egg mixture in the mixing bowl. Whisk & mix. Pour the rest in. Whisk & mix. … It is best to start off mixing with small amount of hot milk, because you’d have better control over the mixture & make sure you won’t be left with lumps.
  • 9. Sieve all of it back to the pan. … Sieving gets rid of the vanilla pod-skin.
  • 10. Put it over high-heat, & whisk ‘all the time’. … The key word here is high-heat. Cooking over weak heat takes too long, & it’ll produce gluten that would toughen your crème, as opposed to the smooth texture you are after. So, always whisk, energetically, to ensure that the crème doesn’t get burnt on the bottom & sides of the pot.
  • 11. After it reaches boiling point (bubbling on the surface), keep cooking for another 2 minutes. You want to cook the flour thoroughly.
  • 12. Pour the hot mixture in to the cold cling-filmed tray. And use the the ice & water method, called an ‘ice bath’, whereby you place your tray in a bigger tray that is filled with ice & water. … Ideally, it shouldn’t be over 1cm deep, so that it cools quickly. – – – – – Not only is this important so as to stop its cooking process, it is vital to cool it ’til below the ‘temperature danger zone’ (between 5 degrees and 60 degrees) where most bacteria grow most rapidly to dangerous levels, some doubling in number within twenty minutes. – – – – If you don’t have a tray & using a bowl instead, use stainless-steel. And use the ‘ice bath’ method with another larger bowl.
  • 13. Cling-film the top surface. The film should lie right on the surface. This is to stop the top surface from forming a skin.
  • 14. Once mostly cool, place the crème in the fridge until needed. Make sure your fridge is set below 5 degrees. If not sure, best to buy a fridge thermometer.
  • 15. Blend well with spatula before using.

.

x x x x x x x x x x x x x x x x x x x x x x x x x x x

.

Suggestions for left-over egg whites:

make meringues, macarons, add one whole egg to make fried egg (or indeed what about a yolk-less fried egg?), or you can freeze it until you need it! To freeze, spoon egg whites in each section of a ice cube tray & pop it in the freezer. Then remove the egg white cubes in a freezer zip-lock bag, label it with the date & store.

June 18th, 2007

Pâte sucrée (sweet pastry dough)

Coco&Me - picture from the stall

(The other week, a photographer called Gideon came by my stall to take some pictures for a picture library. What was really nice was that he has sent me the pictures, like he promised to! – So refreshing, coz I’ve had so many photographers promising to send me a print, but then never do so… – Here’s one that I especially liked!)

.

x … x … x … x … x … x … x … x … x … x … x … x … x … x … x … x …

.

This week, it’s about the tart dough I make every week.
.
Like all the recipes on my blog, it’s tried & tested – I can confidently say that it works & it’s the best. It’s actually tasty & flavourful, you can happily eat it on its own, – not like a bland tart casing that gets forked to the side of the plate with dissapointment.
.
(O.M.G, I’ve come across sooo many unappetizing tart cases in cafes & restaurants, you wonder why you’ve bothered paying your hard-earned money for such a boring tart!

.

And has anyone noticed that many of these establishments are now using ‘ready-made’ empty tartelette shells they buy in bulk from the catering wholesalers? When I was in Bond Street a couple of weeks ago, I had the time to wonder in to a reputable department store there, & as I do, I check their basement cafe, hoping for quality inspiration, & was bitterly dissapointed that the fruit tarts they had on display were using the ‘ready-made tart shells’! With a more than worthy price tag nevertheless! The cheek! £3.75 for a factory made, poorly made, puny fruit tart anyone?

.

It reminds me a bit of that chef off the telly who keeps using ready-made sponge flan bases from the supermarket in his desserts – honestly, why use inferior products with additives & god knows what else in it, & spoil the taste of the dessert you’ve been slaving on?? It really angers me when I see such products advocated. I think the guy is missing the point of “fine pastry making”…)

.

x … x … x … x … x … x … x … x … x … x … x … x … x … x … x … x …

.

Pâte Sucrée:

Pronounced “paht sou-kray”, the texture of pâte sucrée is crisp & crumbly like cookies such as shortbread. The taste is buttery rich, but not overly sweet like what the name suggests. It can be used to make sweet tarts & as a thin sheet under mousse. The left over can become delicious cookies that children would love cutting shapes from. Pâte sucrée is known as a ‘short’ dough, because of its high fat content to flour.

.

Please note, my recipe is a little different compared to the classic Pâte Sucrée recipes around, as it uses some almond powder in it. I think that’s what makes this pastry dough especially flavourful!

.

Pâte Sucrée Recipe:

(To make enough dough for a 8 inch/ 20cm tart)

Ingredients:

Unsalted butter at room temperature … 55 grams
Castor sugar … 32 grams
Eggs … 20 grams
Almond powder … 15 grams
Plain flour … 100 grams

.

  • 1. Place the room teperature butter in a deep mixing bowl (so that it doesn’t spit everywhere when you’re whisking).
  • 2. Cream the butter using a whisk or an electric mixer, beat it till it is ‘creamy’ soft, smooth & light from incorporating the air.
  • 3. Mix in the sugar.
  • 4. Add the eggs bit by bit & whisk it all in.
  • 5. Then mix in the almond powder.
  • 6. Next, in goes the flour. Using a spatula, mix it all in by pushing it against the bowl. Or do what I do, which is to wear food gloves & get in there with your hands. It’s so much quicker to do it like that when you have a large quantity like I do.
  • 7. Pat it in to one big mound, & clingfilm it tight.
  • 8. Refrigerate overnight.
  • 9. When time has come for you to roll it, first prepare a lightly floured clean surface (I use a lightly floured silpat).
  • 10. Get your chunk of chilled pastry dough in the middle.
  • 11. Lightly flour the rolling pin & roll firmly in one direction only, then turn it 90 degrees and roll again. Repeat until desired thickness. Never ‘stretch’ it by hand as this would cause the tart to shrink in the oven!
  • 12. Once the pastry circle is larger than the size of the tin, roll the sheet of pastry around your rolling pin & lift it up.
  • 13. Gently lower it on to your tin. Unroll.
  • 14. Using your fingertips, take the edge of the pastry & ease it in to the sides.
  • 15. Roll the rolling pin across the top to cut the excess pastry off.
  • 16. Put the tin in the refrigerator to rest for atleast 30 minutes before baking.

.

x … x … x … x … x … x … x … x … x … x … x … x … x … x … x … x …

.

Top Tips:

  • Do not over mix. It produces gluten & make the dough tougher.
  • Try to work quickly, minimizing the amount you’re handling it.
  • Work in a cool room. You don’t want the butter to melt in the dough.
  • I wear food gloves. Not only is it hygienic, my warm hands won’t be in contact with the dough.
  • Pick the surface with fork if you’re blind baking.
  • Be absolutely precise with the measurements. if not, you’d either end up with sticky wet dough, or a crumbly dry dough! I always use a digital scale.
  • If the dough becomes too soft while you are rolling, re-chill for a while until it’s manageable again. Adding more flour to it to make it firm is a definate no-no. It’ll unbalance the carefully considered measurements.
  • And remember, prepare in advance! You need to rest the dough in the fridge for a whole night to let the gluten relax. It’s to make the dough workable & to prevent shrinkage. And when you’ve rolled it on to a tart tin, you need to put the tins back in the fridge for 30 minutes atleast – again to prevent shrinkage.

.

x … x … x … x … x … x … x … x … x … x … x … x … x … x … x … x …

« Previous Entries   Next Entries »