Food Hygiene & Awareness Part 1 – Effective hand washing
.
This week I’d like to spend some time writing about the importance of high standards in food hygiene. It is obviously an essential issue to me as a food maker & seller, since, if my customer were to get food poisoning/ or find foreign objects in the product, I would get prosecuted (!), let alone get a bad reputation, I’d have to quit the stall & put an end to my passion!
.
The reason why I decided to write about this rather difficult subject here is so that I can revisit what I have learnt (I did a short course on Food Hygiene & obtained a certificate prior to doing my stall), & also to share this information with you, as pretty much all of it is of a beneficial piece of advice that can be used in anyone’s home.
It’s an ultra lengthy subject, covering topics such as correct food storage, cleaning, etc, so I’m aiming to write up about these in bit by bit series!
.
x x x x x x x x x x x x x x x x x x x x x x x x x x x x x x x x
.
So first off, lets wash our hands before we handle our food.
Sounds like a piece of cake? Not worth covering as a subject? Well please persevere & read on, you’d be surprised to know how it is worth covering as a first subject, aswell as to fully master the art of hand washing! When I did my hygiene course, I myself was surprised about how little I knew about how to effectively & correctly wash my hands!
.
Some key facts to persuade you to wash correctly:
- Hands are the main route for transferring food poisoning bacteria to your food
- Effective & frequent hand washing prevents the spread of cold & flu
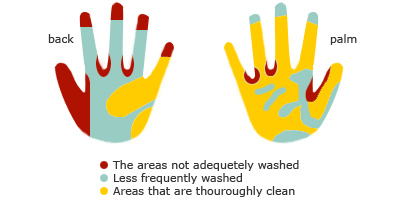
- Even though hands may appear to be clean, they may carry germs or microorganisms that are capable of causing disease
- It is important to know how to wash properly because as you can see from the diagram below, there are parts that are often missed:
 .
.
Wash hands when:
- entering the kitchen
- before preparing food
- after touching raw food such as meat, eggs
- after touching waste or the bin
- after cleaning
- after blowing the nose, even if you’ve used layers of tissue to do so
- after touching an animal
- after changing a nappie
- after using the telephone
- after smoking
- often when someone in your home is sick
.
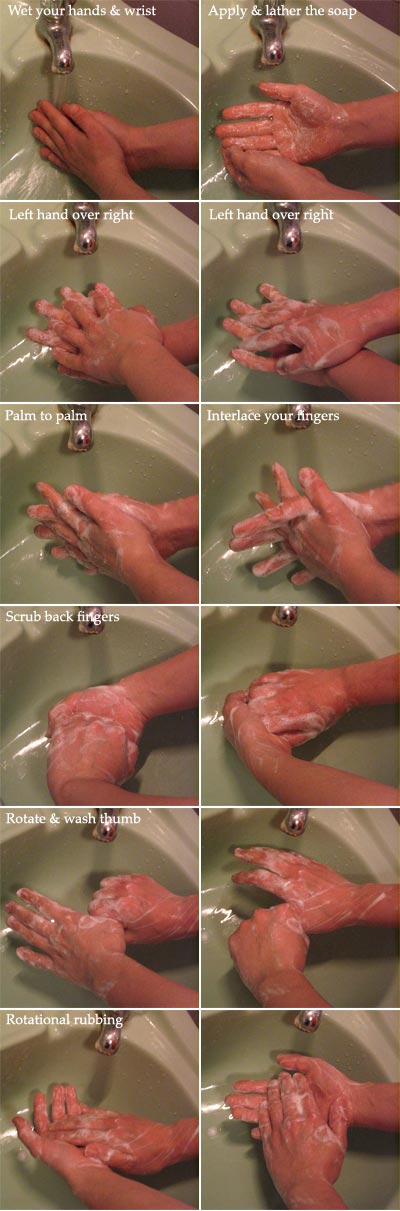
Step-by-step:
- 1. Remove rings & watches.
- 2. Wet hands & wrists thoroughly with warm running water.
- 3. Use soap & lather thoroughly.
- 4. Rub hands together – Right over left, left over right.
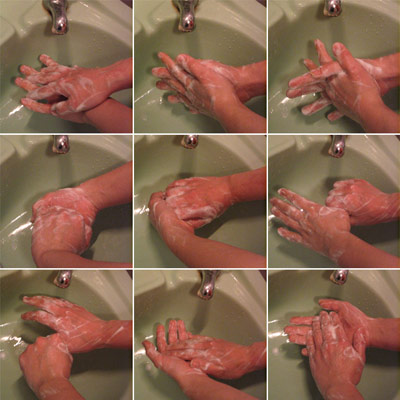
- 5. Palm to palm, interlace your fingers & continue scrubbing by sliding your fingers back and forth. Clean under your nails as well. Steps 4 & 5 should take atleast 20 seconds. For a visual guide to this, see my pictures below.
- 6. Rinse the hands with clean running water thoroughly.
- 7. Use disposable paper towel for drying (Don’t use a common hand towel – remember that germs thrive on moist surfaces). Make sure you dry your hands thoroughly too, as damp hands also spread bacteria.
- 8. Turn off tap using the paper towel, to protect your hands from recontamination.
- 9. If you were washing in the rest room, use a clean paper towel to open the door.
.
I found a quicktime movie of hand washing on a medical site, so click here to view their page.
.
On Thursdays & Fridays (my weekly baking days), I probably wash my hands atleast 50 times… Which, despite it being undeniably total neccesity for hygiene sakes, the down-side of it is it strips moisture and the natural oil from my skin, & it’s always dry n’ itchy… I feel as though my hands alone have aged dramatically since I started the stall… I use hand cream if I remember to do so – but I refuse to wear gloves to bed like my mom does – that’s like admitting that I’m turning in to real mumsy character…!